Deploy and demo Phi-3 in Azure AI
In this walkthrough, I’ll show you how to get started with phi-3-mini-instruct with the Azure AI Model catalog. We will deploy the model to an endpoint, test the endpoint, and build a simple chat interface using Gradio.
This post is based on a Jupyter notebook example I created. You can use it alongside this walkthrough. Find it here: Getting started with Phi-3
Table of Contents
- Introduction
- What is Phi-3
- Use cases
- Getting started
- Call an endpoint
- Build a Chat Interface using Gradio
- Conclusion
Introduction
Azure AI developers, prepare to welcome the newest family member in the world of artificial intelligence models: the Phi-3 series. A pioneer in AI innovation, Microsoft has once again reinvented the wheel, this time by downsizing it. The Phi-3 suite, consisting of small language models (SLMs), is designed to bring the intelligent computing power of large models to a more accessible and efficient form factor.
What is Phi-3?
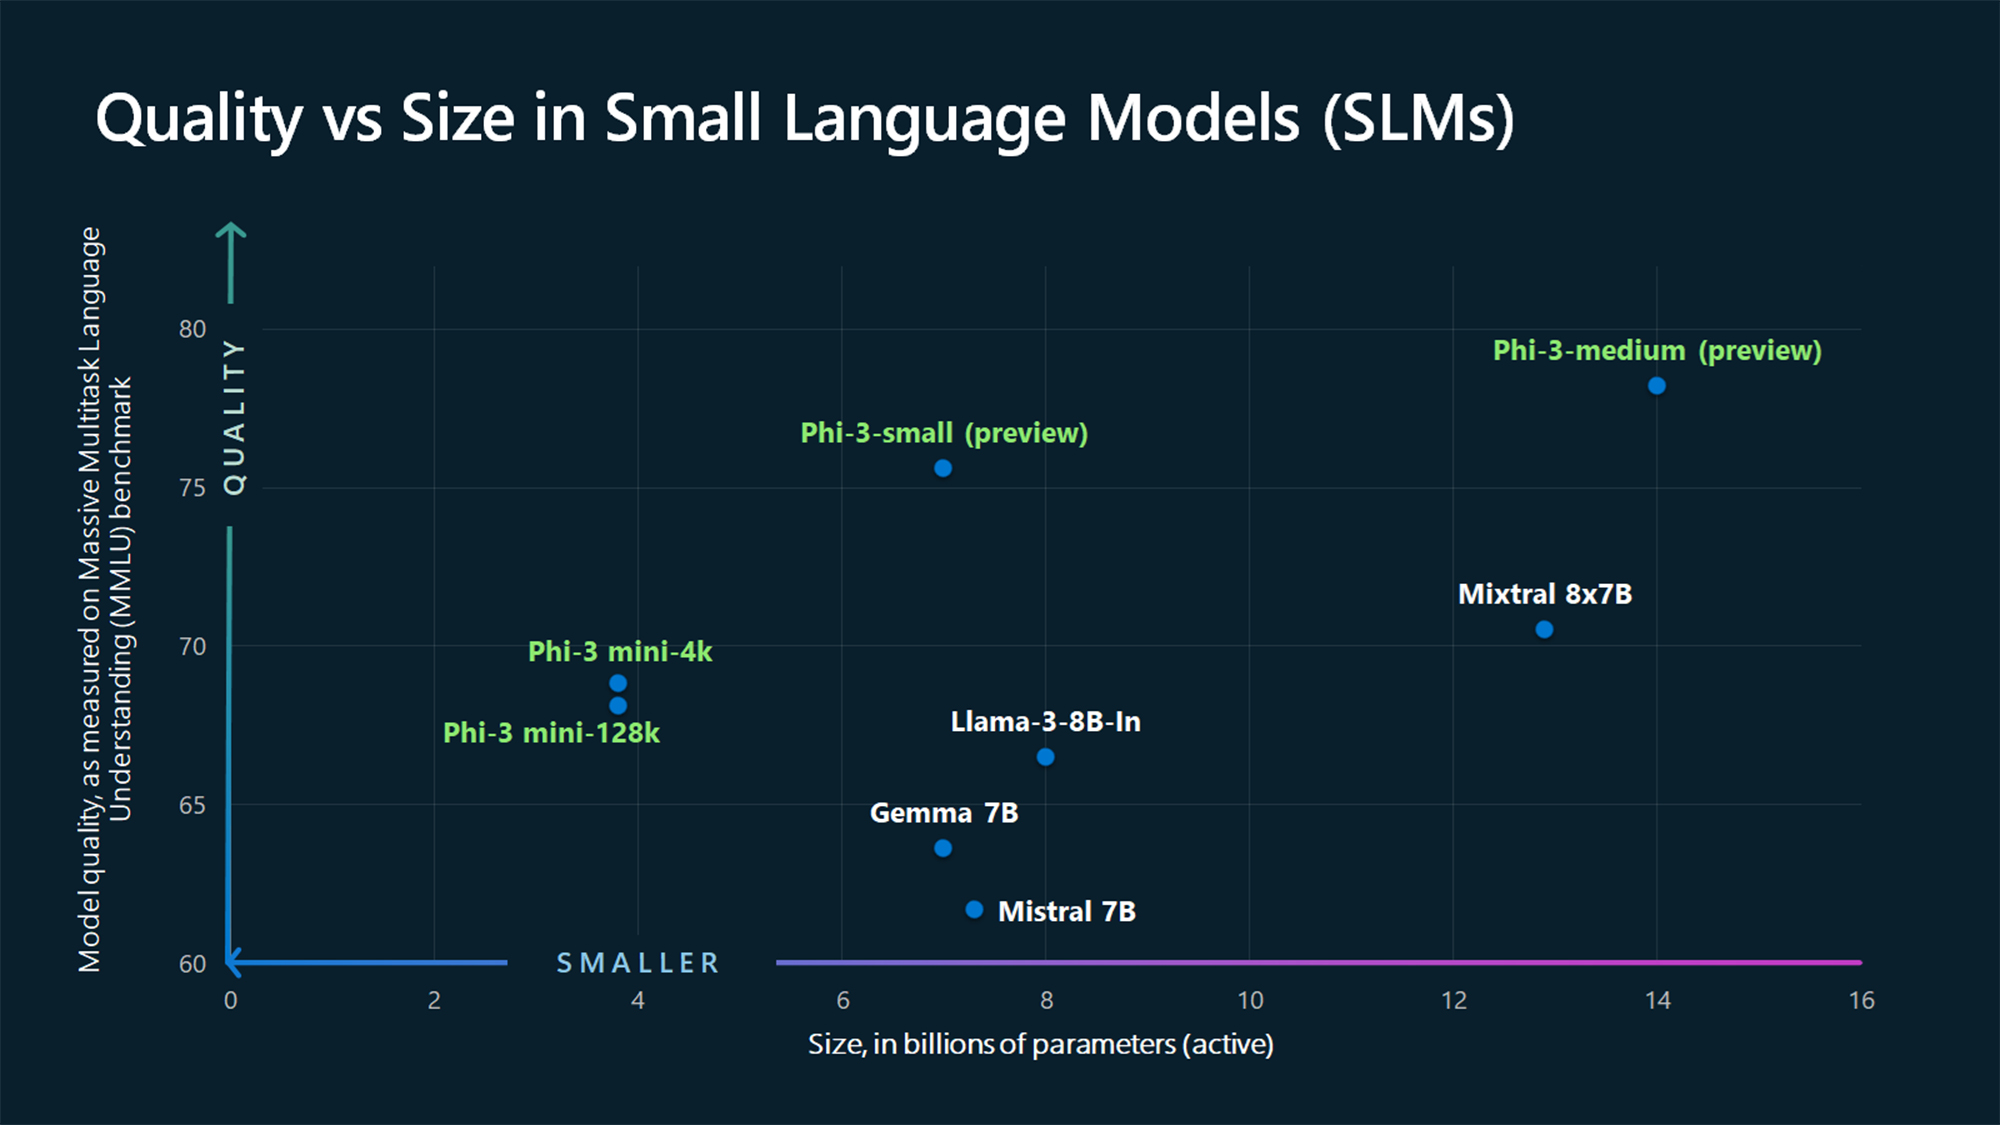
The first to make a debut is the Phi-3-mini, a model with 3.8 billion parameters that boasts performance surpassing models twice its size. This marvel of AI architecture is not only more capable but also available now in the Microsoft Azure AI Model Catalog, Hugging Face, and as a NVIDIA NIM microservice. Its nimbleness allows it to operate fluently across various platforms and even on local devices, a feature that guarantees to democratize AI applications further.
Use Cases
- Local Operation: Deploy AI in remote areas or on devices with limited connectivity.
- Edge Computing: Integrate AI into smart devices for real-time processing.
- Specific Tasks: Tailor models for targeted tasks like summarizing documents, aiding creative writing, or powering chatbots.
Getting Started with Phi-3
Step 1: Set Up Your Azure Account
Before you dive into using Phi-3, you’ll need to set up an Azure account if you don’t already have one. Visit the Azure website and follow the sign-up instructions.
Step 2: Access the Azure AI Model Catalog
Once your account is set up, navigate to the Azure AI Model Catalog where you’ll find the Phi-3 model(s) listed. You can also browse more than 1500+ frontier and open models from LLM providers including: HuggingFace, Meta, Mistral, Cohere and many more.
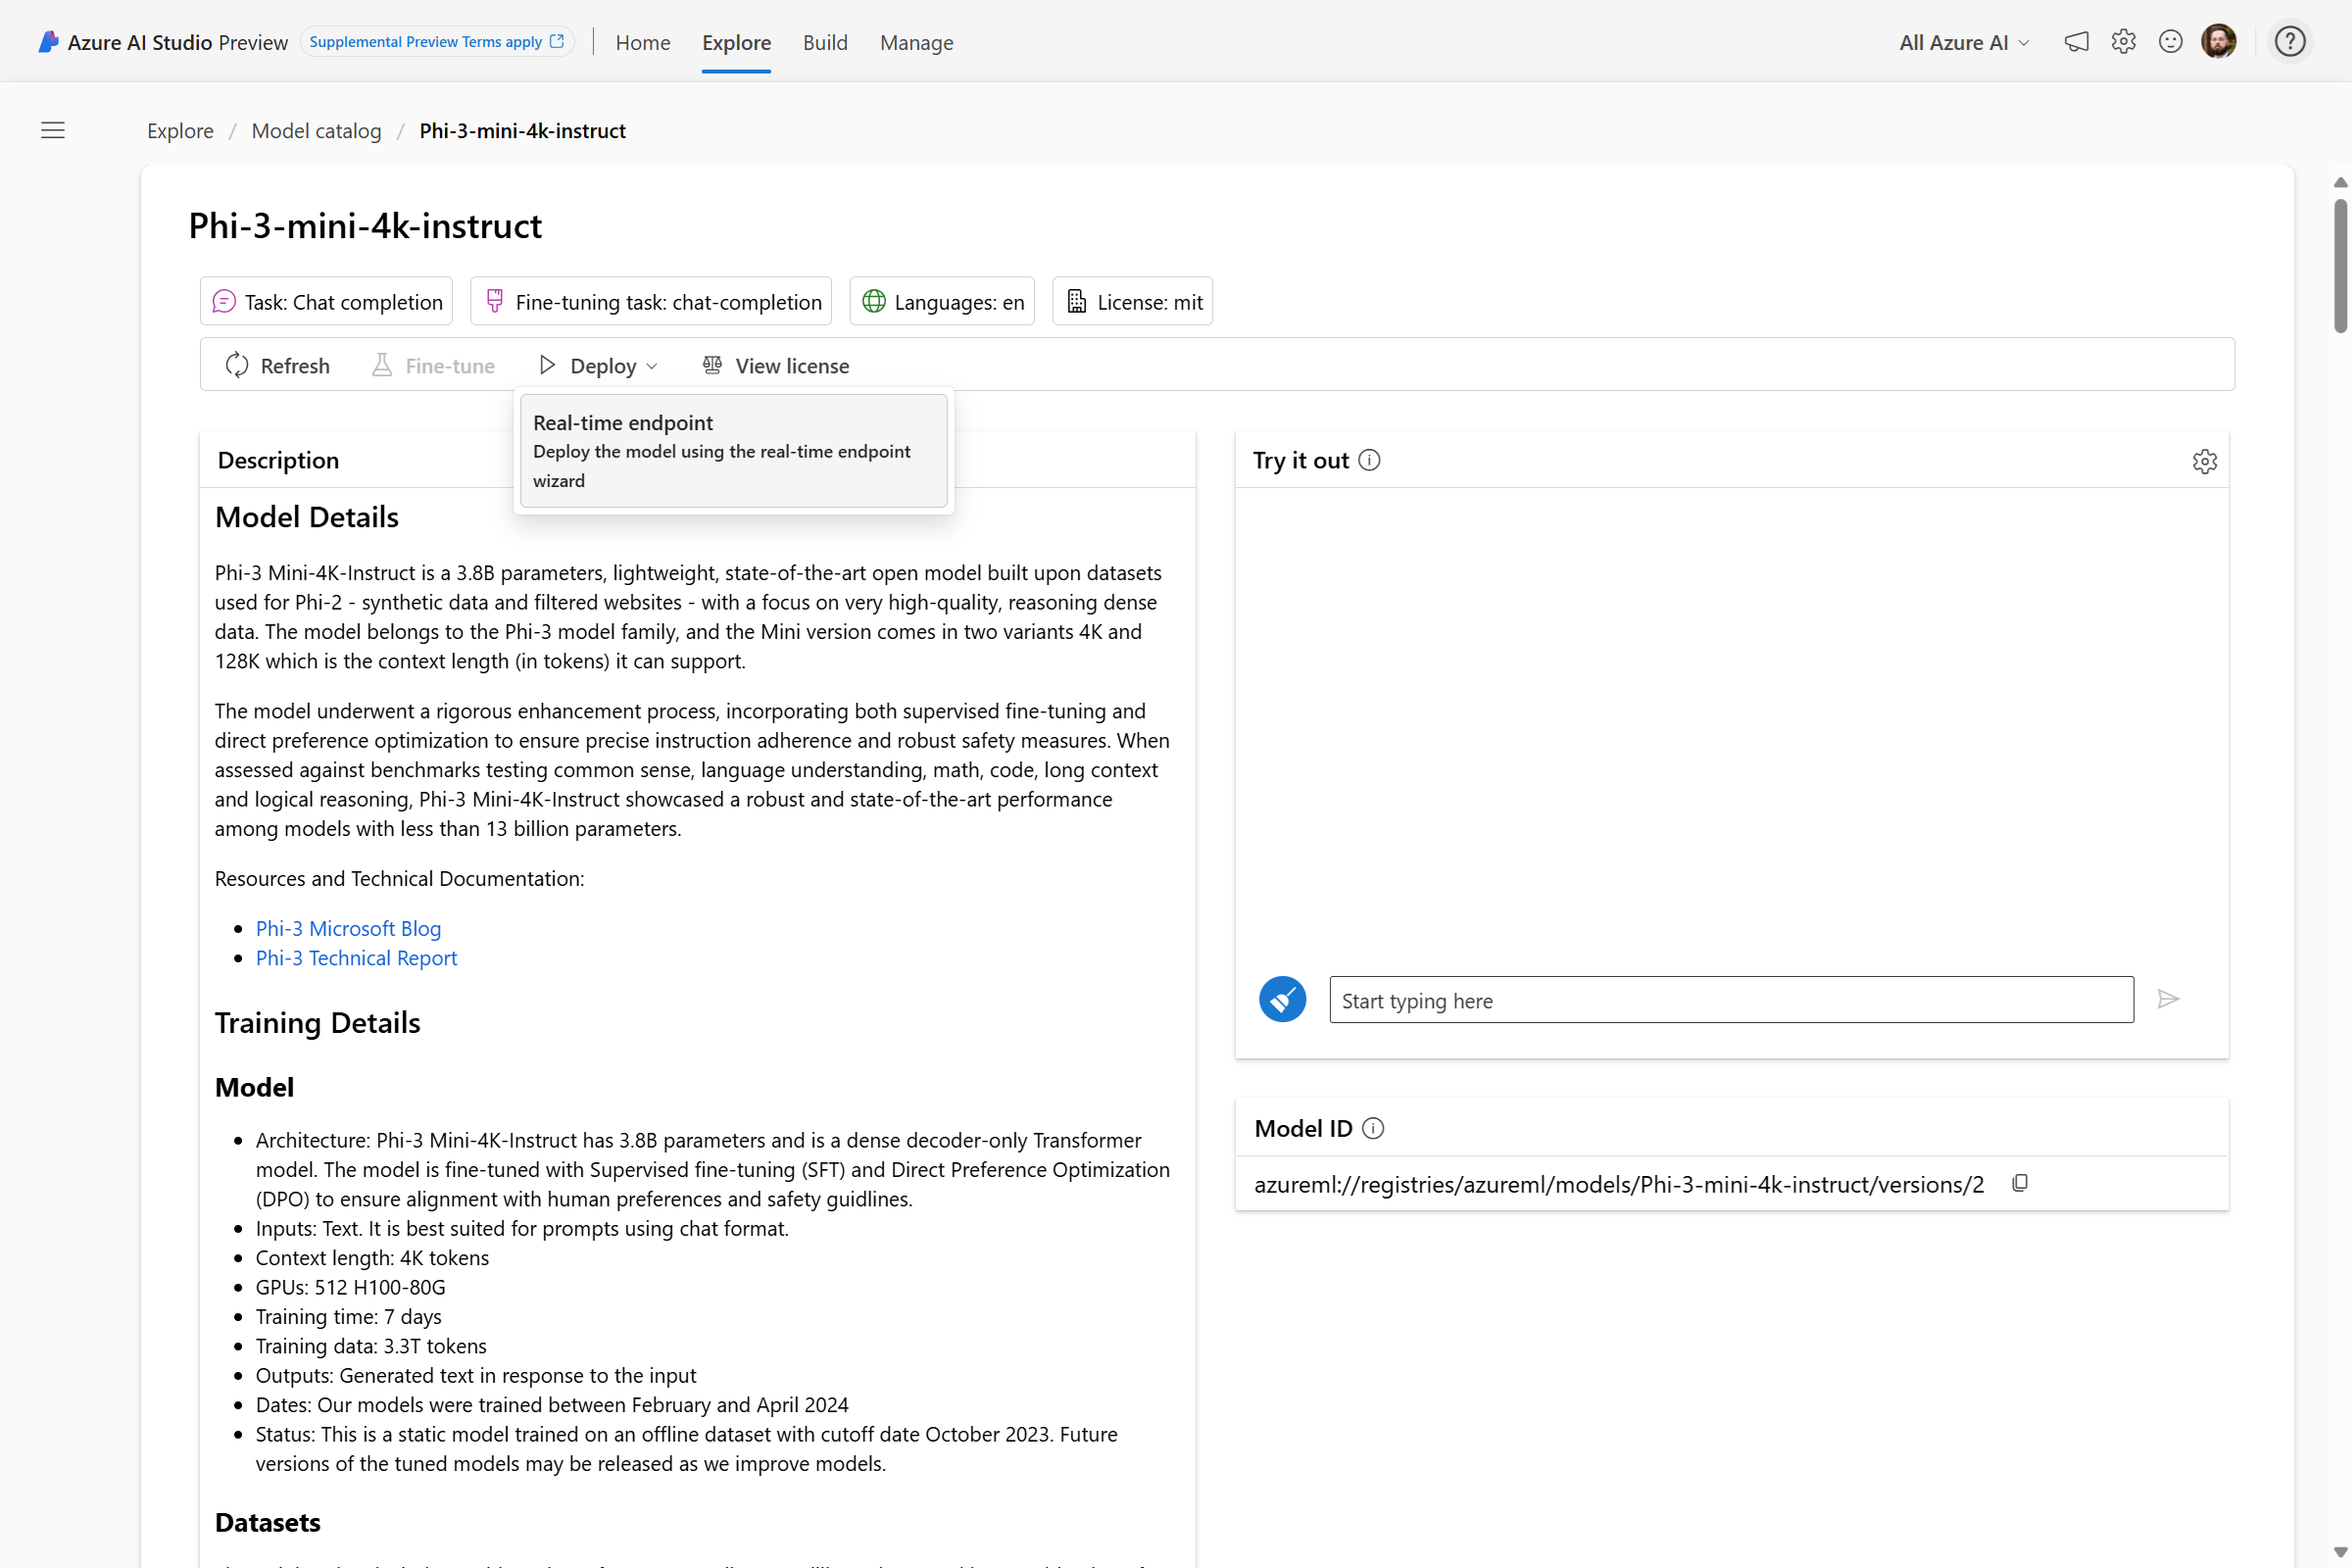
Step 3: Deploy to an online managed endpoint
You can deploy to a real-time endpoint from here directly!
Optionally, you can use the Azure AI Generative AI SDK to deploy any model from the model catalog. Here is an example you can follow.
Under Versions, if you select the elipses (…) under the Properties column, you can find the recommended virtual machine skus within Azure Machine Learning to run Phi-3 in the cloud:
Standard_NC6s_v3, Standard_NC12s_v3, Standard_NC24s_v3, Standard_ND40rs_v2, Standard_NC24ads_A100_v4, Standard_NC48ads_A100_v4, Standard_NC96ads_A100_v4, Standard_ND96asr_v4, Standard_ND96amsr_A100_v4.
Note:
phi-3-mini-instructis small enough to run on a local device, so smaller VMs will work for this demo.
Call an Azure Online Managed Endpoint
You can immediately start using the Phi-3 model through an Azure Managed Online Endpoint. Azure Managed Online Endpoints allow you to deploy your models as a web service easily, so you can send data to your model and receive predictions in return.
Now that we’ve got the endpoint up and running, next we will walk through how to call the endpoint:
Make sure you have the following prerequisites:
- An Azure Machine Learning workspace
- The
requirements.txtPython packages installed - An instance of the Phi-3 model deployed to an Online Endpoint
In this step, we are importing the necessary libraries. MLClient is the main class that we use to interact with Azure AI. DefaultAzureCredential and InteractiveBrowserCredential are used for authentication purposes. The os library is used to access environment variables.
Next, we will set up the credentials to authenticate with Azure. We first try to use the DefaultAzureCredential. If that fails (for example, if we are running the code on a machine that is not logged into Azure), we fall back to using InteractiveBrowserCredential, which will prompt the user to log in.
Finally, we create an MLClient for our Azure AI workspace. We use environment variables to get the subscription ID, resource group name, and workspace name.
from azure.ai.ml import MLClient
from azure.identity import DefaultAzureCredential, InteractiveBrowserCredential
import os

try:
    credential = DefaultAzureCredential()
    credential.get_token("https://management.azure.com/.default")
except Exception as ex:
    credential = InteractiveBrowserCredential()

workspace_ml_client = MLClient(
    credential,
    subscription_id=os.getenv("SUBSCRIPTION_ID"),
    resource_group_name=os.getenv("RESOURCE_GROUP"),
    workspace_name=os.getenv("WORKSPACE_NAME"),
)
Optional: Loading a dataset with prompt examples
This step is optional and not required to demo Phi-3. However, if you want to experiment with samples of diverse topics for the model, you can use a dataset. In this case, we are using the ultrachat_200k dataset from HuggingFace. First, we import the necessary libraries: pandas for data manipulation and datasets for loading the dataset.
Next, we load the ultrachat_200k dataset from Hugging Face and select the test_sft split.
We then convert the dataset into a pandas DataFrame and drop the ‘prompt_id’ and ‘messages’ columns. These columns are not needed for our current task.
Finally, we display a random sample of 5 rows from the DataFrame. This gives us a quick look at the data we’ll be working with.
dataset = load_dataset("HuggingFaceH4/ultrachat_200k")["test_sft"]
df = pd.DataFrame(dataset).drop(columns=["prompt_id", "messages"])
df.sample(5)
Optional (continued): Selecting a Random Sample
In this section, we are selecting a random sample from our dataset to use as a test case for Phi-3. First, we sample 5 random examples from the DataFrame and convert them to a list. This gives us a small set of examples to choose from.
Next, we convert the examples to a JSON string. This is done for pretty printing, which makes the examples easier to read.
We then select a random index from the examples. This is done using the random.randint function, which returns a random integer within the specified range. We use this random index to select an example from our list.
examples = df.sample(5).values.tolist()
examples_json = json.dumps(examples, indent=2)
i = random.randint(0, len(examples) - 1)
sample = examples[i]
print(sample)
This process ensures that we have a diverse range of topics to test our model with, and that the testing process is as unbiased as possible.
Invoking the Phi-3 Model
In this section, we are invoking the Phi-3 model to generate a response to a user’s question.
First, we define the input data. This includes the user’s message and some parameters for the model. The parameters control the randomness of the model’s output.
Next, we write the input data to a temporary file. This is necessary because the invoke method of the workspace_ml_client.online_endpoints object requires a file as input.
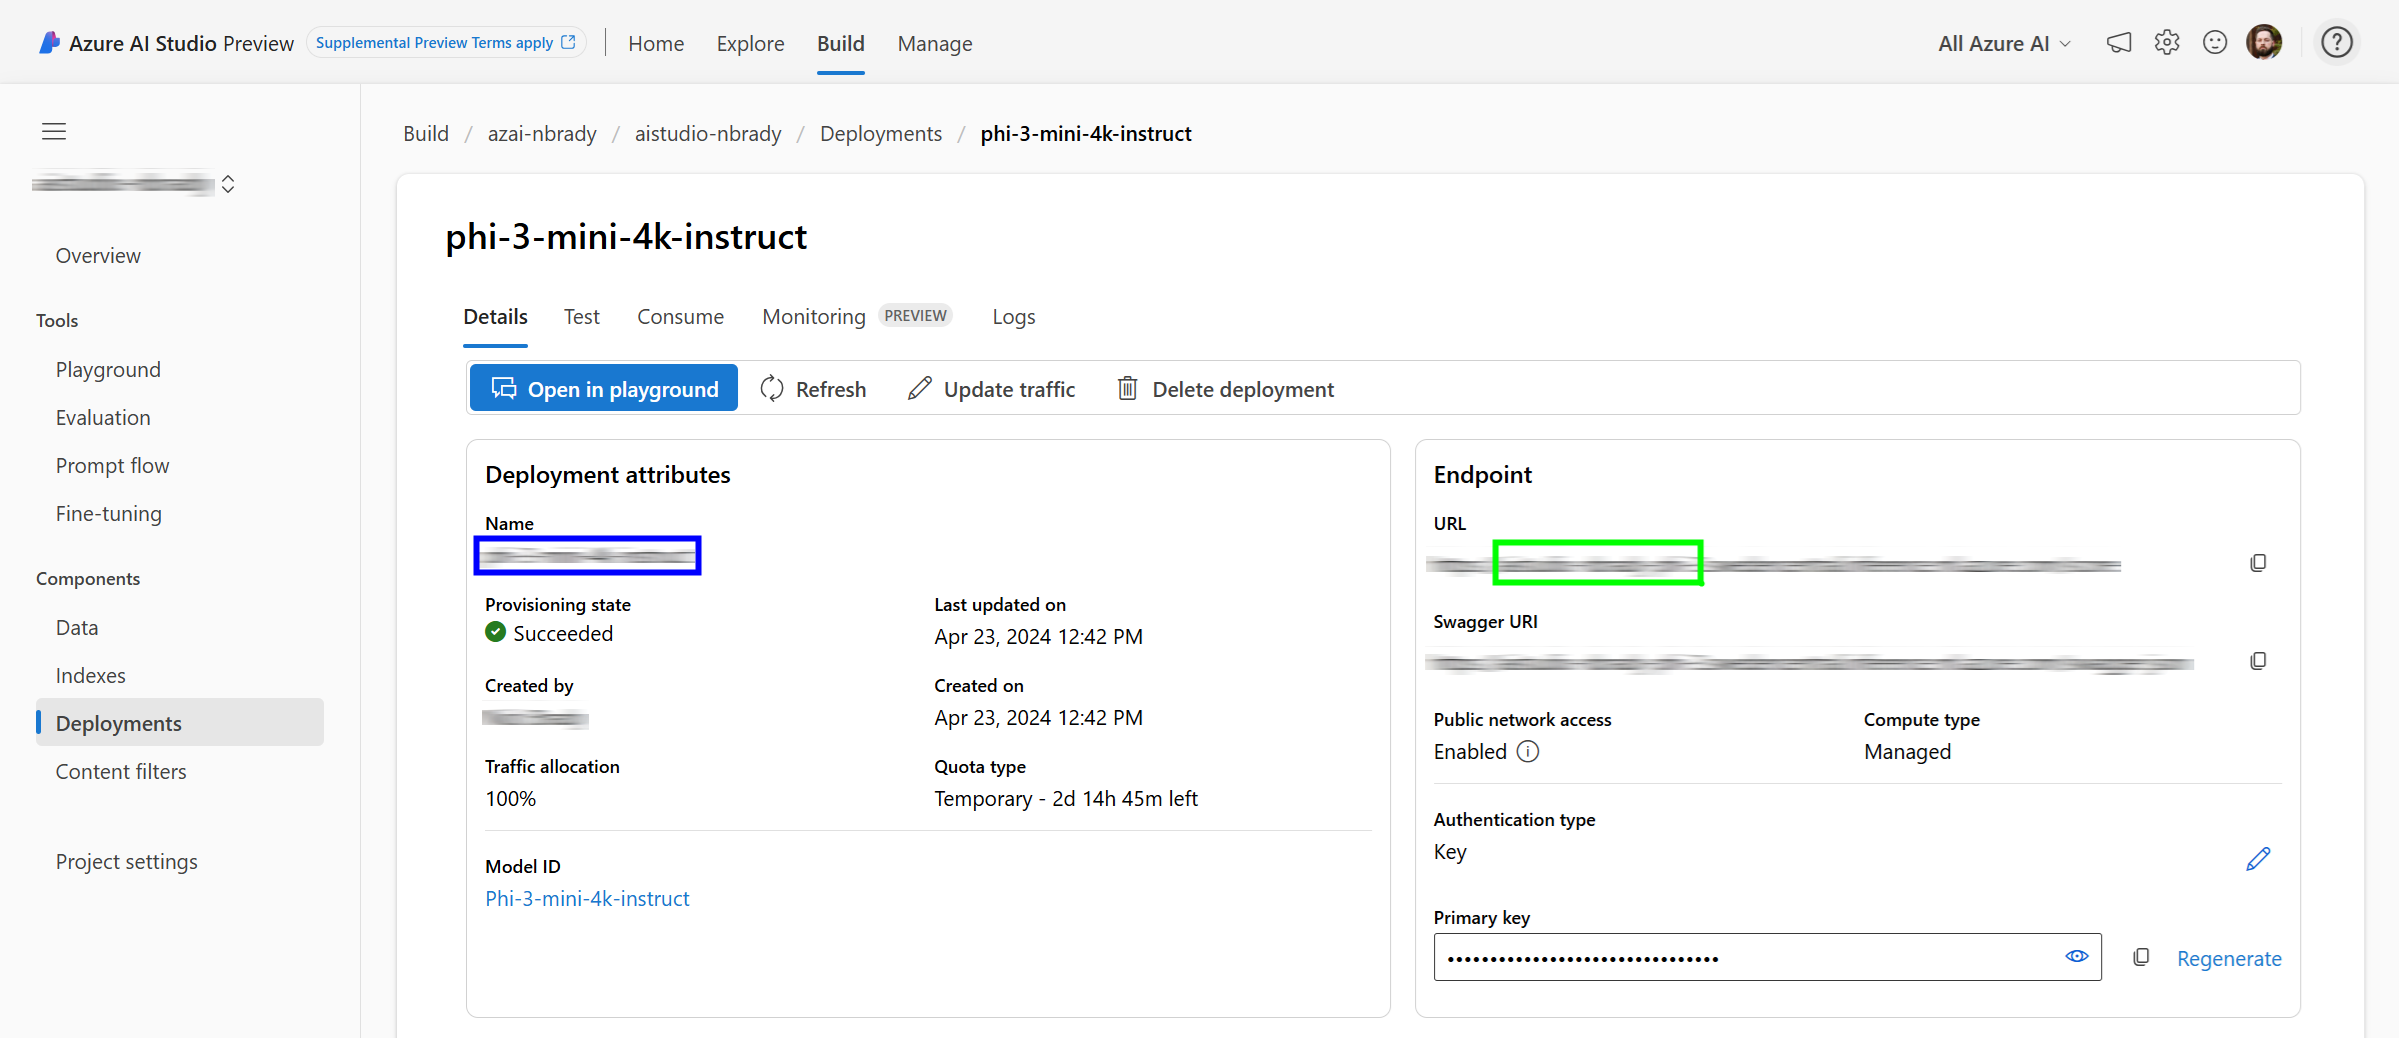
You will find the endpoint_name and deployment_name details available under Build > Components > Deployments > then, select the deployment you created. You’ll find this deployment_name available under the blue rectangle and the endpoint_name under the green rectangle. The endpoint name will look like this: https://endpoint_name.azureregion.inference.ml.azure.com/score. Here’s an example:
We then invoke the Phi-3 model and get the response. The invoke method sends the input data to the model and returns the model’s output.
After getting the response, we parse it and add it to the input data. This allows us to keep track of the conversation history. Finally, we print the updated input data. This includes the user’s message and the model’s response.
messages = { "input_data": {
    "input_string": [ { "role": "user", "content": "I am going to Paris, what should I see?"} ],
    "parameters": { "temperature": 0.7, "top_p": 0.9, "do_sample": True, "max_new_tokens": 1000, }, }
}

with tempfile.NamedTemporaryFile(suffix=".json", delete=False, mode='w') as temp:
    json.dump(messages, temp)
    temp_file_name = temp.name

response = workspace_ml_client.online_endpoints.invoke(
    endpoint_name="phi-3-mini-endpoint",
    deployment_name="phi-3-mini-4k-instruct",
    request_file=temp_file_name,
)
response_json = json.loads(response)["output"]
response_dict = {'content': response_json, 'role': 'assistant'}
messages['input_data']['input_string'].append(response_dict)

print(json.dumps(messages["input_data"]["input_string"],indent=2))
This process allows us to interact with the Phi-3 model and get its responses to various inputs.
Preparing the Sample Input
You still with me? Good! In this section, we’re doing the same as before, but we are preparing the input data for the Phi-3 model continuing with the sample we created in the previous section.
First, we define the input data. This includes the user’s message and some parameters for the model. The parameters control the randomness of the model’s output. The user’s message is the first element of the selected sample from the previous section.
i = random.randint(0, len(examples) - 1)
sample = examples[i]

messages = { "input_data": {
    "input_string": [{"role": "user", "content": sample[0]}],
    "parameters": { "temperature": 0.7, "top_p": 0.9, "do_sample": True, "max_new_tokens": 1000, }, }
}

with tempfile.NamedTemporaryFile(suffix=".json", delete=False, mode="w") as temp:
    json.dump(messages, temp)
    temp_file_name = temp.name

response = workspace_ml_client.online_endpoints.invoke(
    endpoint_name="aistudio-nbrady-phi-3",
    deployment_name="phi-3-mini-4k-instruct",
    request_file=temp_file_name,
)
response_json = json.loads(response)["output"]
response_dict = {'content': response_json, 'role': 'assistant'}
messages['input_data']['input_string'].append(response_dict)

print(json.dumps(messages["input_data"]["input_string"],indent=2))
Building the Chat Interface
In this section, we are building a chat interface using Gradio, a Python library for creating UIs for machine learning models.
First, we define a function predict that takes a message and a history of previous messages as input. This function prepares the input data for the Phi-3 model, invokes the model, and processes the model’s response.
We will use the same tempile, invoke, and response logic as we had before.
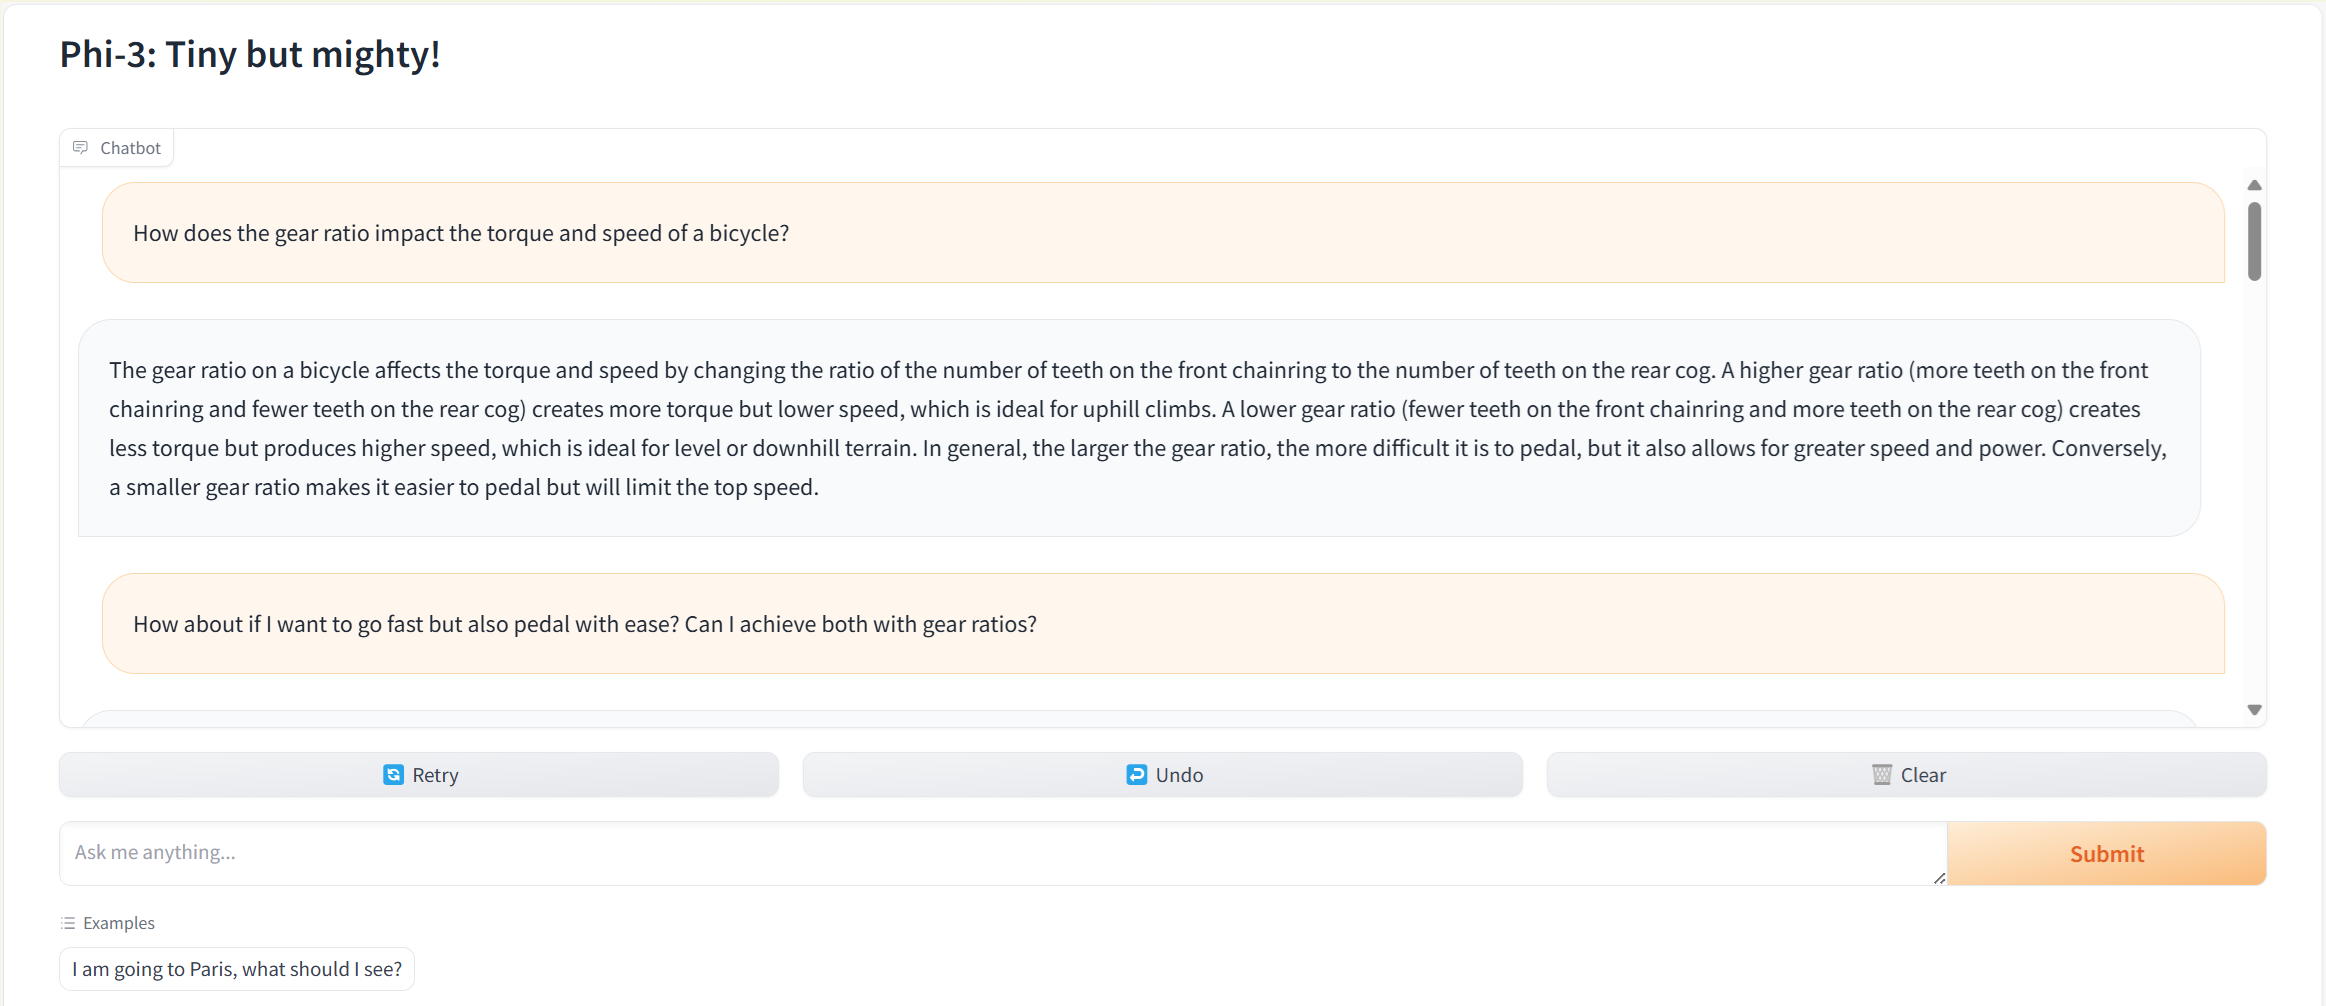
After defining the predict function, we create a Gradio interface for it. This interface includes a textbox for the user to enter their message and a chatbot to display the conversation history. We also provide some example conversations to help users understand how to interact with the chatbot.
Note: We also provided some example conversations (
examplesparameter ingr.ChatInterface) to help users understand how to interact with the chatbot. These examples were generated from an optional dataset. However, if you don’t have such a dataset or prefer not to use it, you can simply remove theexamplesparameter from thegr.ChatInterfacecall.
Launch the Gradio interface
import gradio as gr

def predict(message, history):
    messages = {
        "input_data": {
            "input_string": [],
            "parameters": { "temperature": 0.6, "top_p": 0.9, "do_sample": True, "max_new_tokens": 1000, }, }
    }
    for user, assistant in history:
        messages["input_data"]["input_string"].append({"content": user, "role": "user"})
        messages["input_data"]["input_string"].append({"content": assistant, "role": "assistant"})
    messages["input_data"]["input_string"].append({"content": message, "role": "user"})

    with tempfile.NamedTemporaryFile(suffix=".json", delete=False, mode="w") as temp:
        json.dump(messages, temp)
        temp_file_name = temp.name

    response = workspace_ml_client.online_endpoints.invoke(
        endpoint_name="aistudio-nbrady-phi-3",
        deployment_name="phi-3-mini-4k-instruct",
        request_file=temp_file_name,
    )
    response_json = json.loads(response)["output"]
    response_dict = {"content": response_json, "role": "assistant"}
    messages["input_data"]["input_string"].append(response_dict)

    return response_json

gr.ChatInterface(
    fn=predict,
    textbox=gr.Textbox(
        value="I am going to Paris, what should I see?",
        placeholder="Ask me anything...",
        scale=5,
        lines=3,
    ),
    chatbot=gr.Chatbot(render_markdown=True),
    examples=examples, # This is the optional list of examples we created earlier
    title="Phi-3: Tiny but mighty!",
    fill_height=True,
).launch()
This process creates a user-friendly chat interface for the Phi-3 model.
Conclusion
Diving into Microsoft’s Phi-3 family of small language models (SLMs) with Azure AI via the Model catalog, we have learned that big potential no longer requires big models. My aim was for this blog was to illustrate:
- Phi-3 models bridge the gap between the need for powerful AI and the constraints of computational resources.
- Step-by-step guidance bolsters confidence in deploying and integrating AI into applications.
- Practical exercises solidify understanding, as experienced with our own Gradio-powered chatbot.
Don’t stop here―continue exploring, learning, and building.
Want to see more content like this? Consider connecting with me on LinkedIn. If you’ve found this tutorial helpful, please also consider sharing it with colleagues or through your professional network. The more we share, the more we can collectively grow the field of AI for all. I cannot wait to see what you create with Azure AI. Happy innovating!