Enterprise-Grade Streaming AI Agents with Azure AI Agent Service
In this walkthrough, you’ll learn how to build an enterprise-grade streaming AI agent with Azure AI Agent Service. This demo shows you how to integrate local HR documents, vector stores, Bing search for external context, and custom Python functions into a single agent—all while delivering real-time responses through a sleek Gradio chat UI.
This post is based on a comprehensive Jupyter notebook example in the azure-samples/azure-ai-agent-service-enterprise-demo repository. You can follow along with the repository to deploy your own enterprise agent.
Table of Contents
- Introduction
- Repository Overview
- Key Features
- Setup and Installation
- Detailed Walkthrough
- Conclusion
Introduction
As organizations grow, so does the need for intelligent assistants that can answer questions in real time while integrating multiple data sources. The Enterprise Demo in this repository uses the power of Azure AI Agent Service to create a streaming agent that consults local HR documents, retrieves information using Bing search, and utilizes custom Python functions—all orchestrated through a Gradio chat interface.

This post will guide you through:
- Programmatically creating or reusing an AI agent.
- Incorporating enterprise data via vector stores for retrieval-augmented generation (RAG).
- Streaming partial responses in real time with a custom event handler.
- Building an interactive chat interface with Gradio.
Repository Overview
The repository is organized as follows:
azure-samples-azure-ai-agent-service-enterprise-demo/
├── README.md
├── CHANGELOG.md
├── CONTRIBUTING.md
├── LICENSE.md
├── enterprise-streaming-agent.ipynb
├── enterprise_functions.py
├── requirements.txt
├── .env.example
├── assets/
├── enterprise-data/
│ ├── code_of_conduct.md
│ ├── holiday_and_vacation_policy.md
│ ├── hr_policy.md
│ ├── performance_review_process.md
│ └── remote_work_policy.md
└── .github/
├── CODE_OF_CONDUCT.md
├── ISSUE_TEMPLATE.md
└── PULL_REQUEST_TEMPLATE.md
A few highlights:
- enterprise-streaming-agent.ipynb: A Jupyter Notebook that demonstrates how to set up and interact with the agent.
- enterprise_functions.py: Contains custom Python functions (like
fetch_weather,fetch_stock_price, andsend_email) that power additional tools. - enterprise-data/: Includes HR policies and other internal documents that the agent uses for context.
- .env.example: Provides environment variable configurations for secret keys and connection strings.
Key Features
This demo guides you through creating a robust enterprise agent with features such as:
- Agent Creation & Reuse: Programmatically create a new agent or update an existing one using Azure AI Foundry.
- Vector Store Integration: Upload local HR and policy documents into a vector store to enable document search via retrieval-augmented generation.
- Toolset Enrichment: Incorporate external tools such as Bing search for real-time context and custom Python functions.
- Real-Time Streaming: Display partial agent responses as they stream from the server using a custom event handler.
- Interactive Gradio UI: A Gradio interface that mirrors real-world chat applications, making it easy to test and extend.
Setup and Installation
Follow these steps to get up and running with the demo:
1. Clone the Repository
Clone the repository to your local machine:
git clone https://github.com/Azure-Samples/azure-ai-agent-service-enterprise-demo.git
cd azure-ai-agent-service-enterprise-demo
2. Create and Activate a Virtual Environment
Create a virtual environment to manage dependencies:
python -m venv .venv
Activate the virtual environment:
Windows:
.venv\Scripts\activate
macOS/Linux:
source .venv/bin/activate
3. Install Dependencies
Install the required packages using pip:
pip install -r requirements.txt
4. Configure Environment Variables
Copy the sample .env.example to .env and update it with your configuration details (e.g., Azure AI Foundry connection string, model name, API keys):
cp .env.example .env
Note: Be sure to keep your credentials safe and add
.envto your.gitignore.
Detailed Walkthrough
The core logic of the enterprise agent is demonstrated in the Jupyter Notebook. Here’s an overview of the main steps:
Connecting to Azure AI Foundry
The demo begins by authenticating with Azure AI Foundry using DefaultAzureCredential and then creates an AIProjectClient:
from azure.ai.projects import AIProjectClient
from azure.identity import DefaultAzureCredential
import os

credential = DefaultAzureCredential()
project_client = AIProjectClient.from_connection_string(
    credential=credential,
    conn_str=os.environ["PROJECT_CONNECTION_STRING"]
)
Setting Up Tools and Vector Stores
The Notebook demonstrates:
- Bing Integration: Attempts to connect to a Bing grounding tool, which enhances the agent’s responses with web search results.
- Vector Store Creation: Uploads local HR documents from
enterprise-data/into a vector store. If an existing vector store is found by name, it’s reused. - Custom Function Integration: Loads custom Python functions (e.g.,
fetch_weather) fromenterprise_functions.pyand adds them to a customToolSet.
Building a Custom Event Handler
A custom event handler (MyEventHandler) streams partial agent responses to the console and manages tool call logs. This allows you to see real-time outputs as the agent builds its final response.
Creating or Reusing the Agent
Depending on whether an agent with the name my-enterprise-agent exists, the demo either updates it with new tools or creates a new one:
AGENT_NAME = "my-enterprise-agent"
found_agent = next((a for a in project_client.agents.list_agents().data if a.name == AGENT_NAME), None)

if found_agent:
    agent = project_client.agents.update_agent(
        assistant_id=found_agent.id,
        model=found_agent.model,
        instructions=found_agent.instructions,
        toolset=toolset,
    )
    print(f"Reusing agent > {agent.name} (id: {agent.id})")
else:
    agent = project_client.agents.create_agent(
        model=os.environ.get("MODEL_DEPLOYMENT_NAME", "gpt-4o"),
        name=AGENT_NAME,
        instructions="You are a helpful enterprise assistant...",
        toolset=toolset
    )
    print(f"Creating agent > {agent.name} (id: {agent.id})")
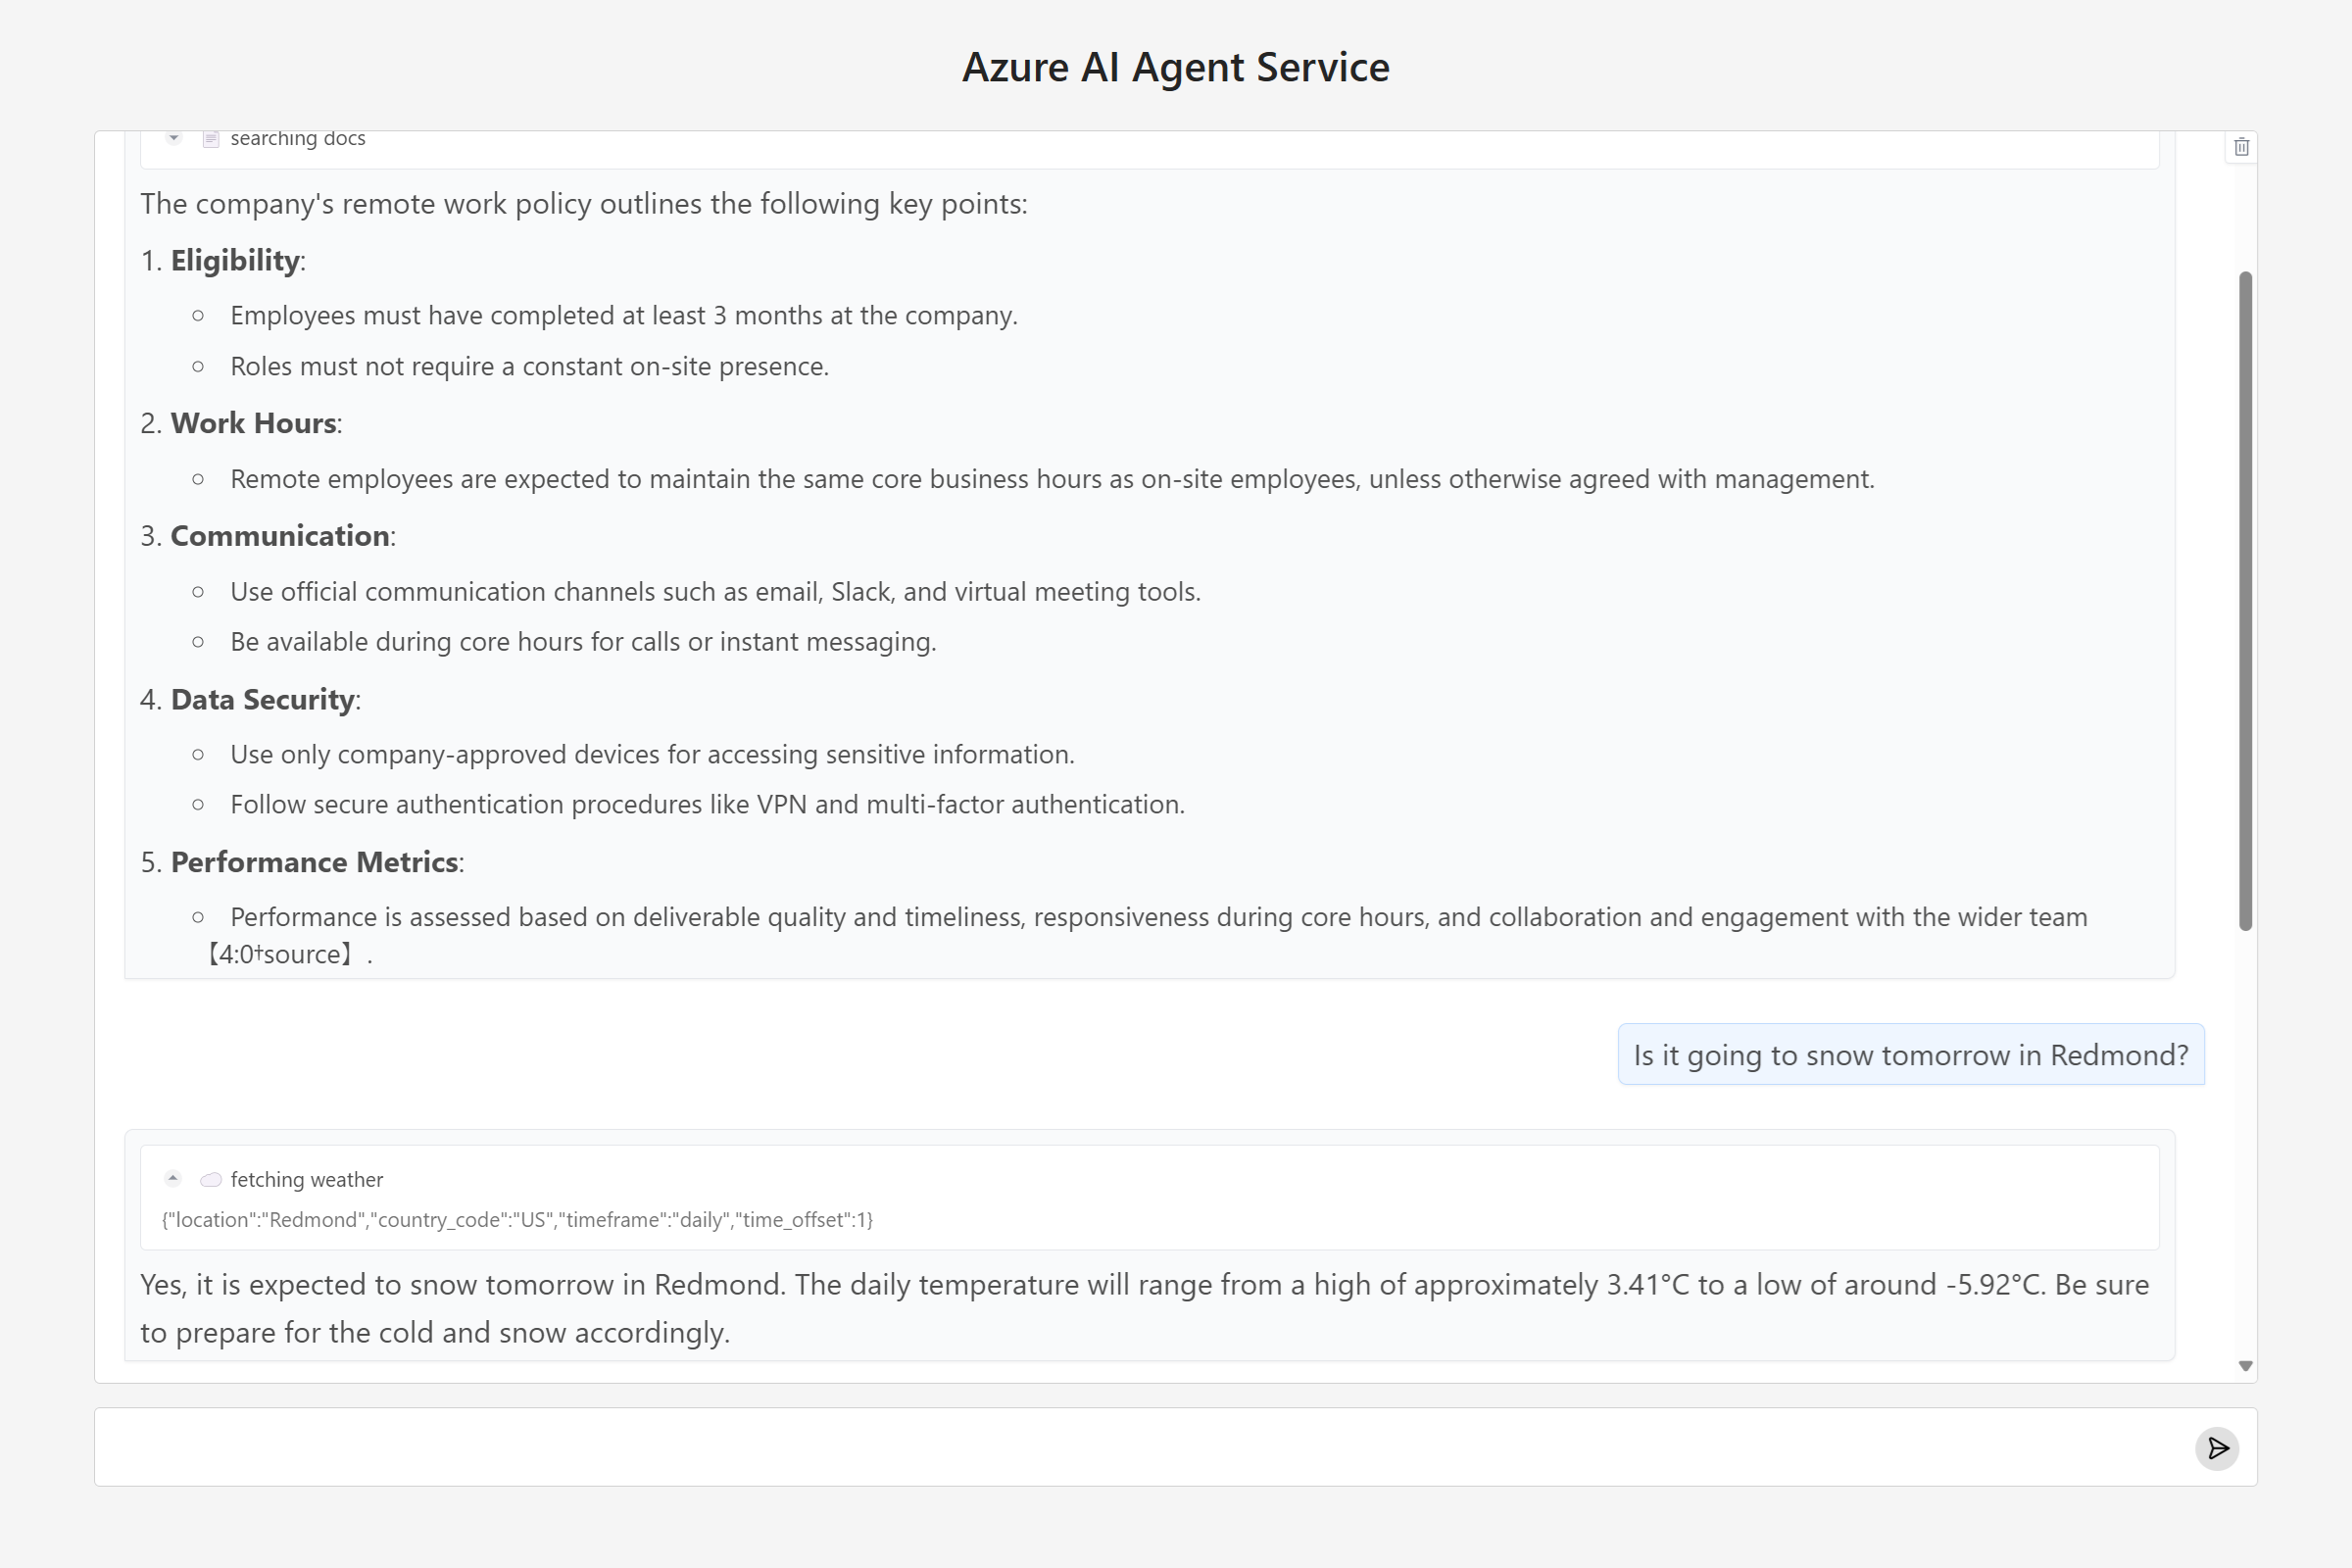
Launching the Gradio Chat Interface
Finally, a Gradio-based UI is built to interact with the agent. The interface displays user messages, partial function call outputs, and complete agent responses in real time.
import gradio as gr

with gr.Blocks(title="Azure AI Enterprise Agent", fill_height=True) as demo:
    gr.HTML("<h1 style='text-align: center;'>Azure AI Enterprise Agent Service</h1>")
    chatbot = gr.Chatbot(show_label=False)
    textbox = gr.Textbox(lines=1, show_label=False, submit_btn=True)

    textbox.submit(fn=azure_enterprise_chat, inputs=[textbox, chatbot],
                   outputs=[chatbot, textbox])

    chatbot.clear(fn=lambda: project_client.agents.create_thread(), outputs=chatbot)

demo.launch()
You can examine the full notebook for more complete details on configuring the tools, handling events, and managing conversation threads.
Conclusion
 In this walkthrough, we built a streaming enterprise agent using Azure AI Agent Service. By integrating internal HR documents with vector stores, enriching responses via Bing search, and using custom Python functions, the agent is able to deliver contextually rich and real-time responses. The interactive Gradio UI enhances the end-user experience, making it easy to test, demonstrate, and extend the functionality of your AI agent.
This repository serves as a comprehensive blueprint for developers looking to deploy enterprise-scale AI agents with real-time streaming capabilities. If you find this demo useful, please consider contributing to the project or sharing your feedback.
Happy innovating!