The Paradox of Choice: Creating an Arena to Compare Frontier Models in Azure AI
In this walkthrough, I’ll show you how to get started with deploying frontier models via serverless APIs in the Azure AI Model catalog. We will deploy several models to an endpoint, then build a chat arena to compare frontier models side-by-side using Gradio.
This post is based on a Jupyter notebook example I created. You can use it alongside this walkthrough. Find it here: Azure AI Models-as-a-Service Chatbot Arena
Table of Contents
- Introduction
- Azure AI Models-as-a-Service (MaaS)
- Deploy models as Serverless APIs
- Introducing the Azure AI Model Inference API
- Step-by-Step Walkthrough to Build the Azure AI Models-as-a-Service (MaaS) Chatbot Arena
- Conclusion
Introduction
In the world of artificial intelligence, developers and organizations are increasingly faced with a paradox of choice. As the number of large language models (LLMs) continues to grow, so too does the complexity of selecting the right model for a specific application. This concept, introduced by psychologist Barry Schwartz, highlights the stress and indecision that can arise when faced with too many options. In AI, this paradox is particularly pronounced, as the decision-making process involves balancing factors like model quality, performance, and suitability for end-user needs.
At Microsoft Azure AI, we recognize this challenge. Our goal is to alleviate the burden of choice by providing tools and platforms that offer the best selection of frontier and open models. With more than 1,700 models from industry leaders like Microsoft, OpenAI, Mistral, Meta, Stability AI, Core42, Nixtla, HuggingFace, and others, Azure AI stands out as a powerhouse in the AI ecosystem.
But what truly sets Azure AI apart is the Azure AI Model Inference SDK, designed to simplify the process of experimenting with and comparing these models. In this blog post, we’ll explore how Azure AI’s Model-as-a-Service (MaaS) can help navigate this paradox of choice. We’ll guide you through an example that uses the Azure AI Inference SDK to create an interactive arena for comparing frontier models in real time, inspired by LMSYS’s Chatbot Arena. Along the way, we’ll showcase features like human preference-based evaluations and subject sample generation using the MMLU dataset, demonstrating how these tools can streamline your AI development process.
Azure AI Models-as-a-Service (MaaS)
As organizations and developers look for the right tools to harness the power of AI, Azure AI Models-as-a-Service (MaaS) emerges as a versatile and powerful offering. But what exactly is MaaS, and how does it help in navigating the paradox of choice? Let’s dive into some frequently asked questions to understand its core features and benefits.
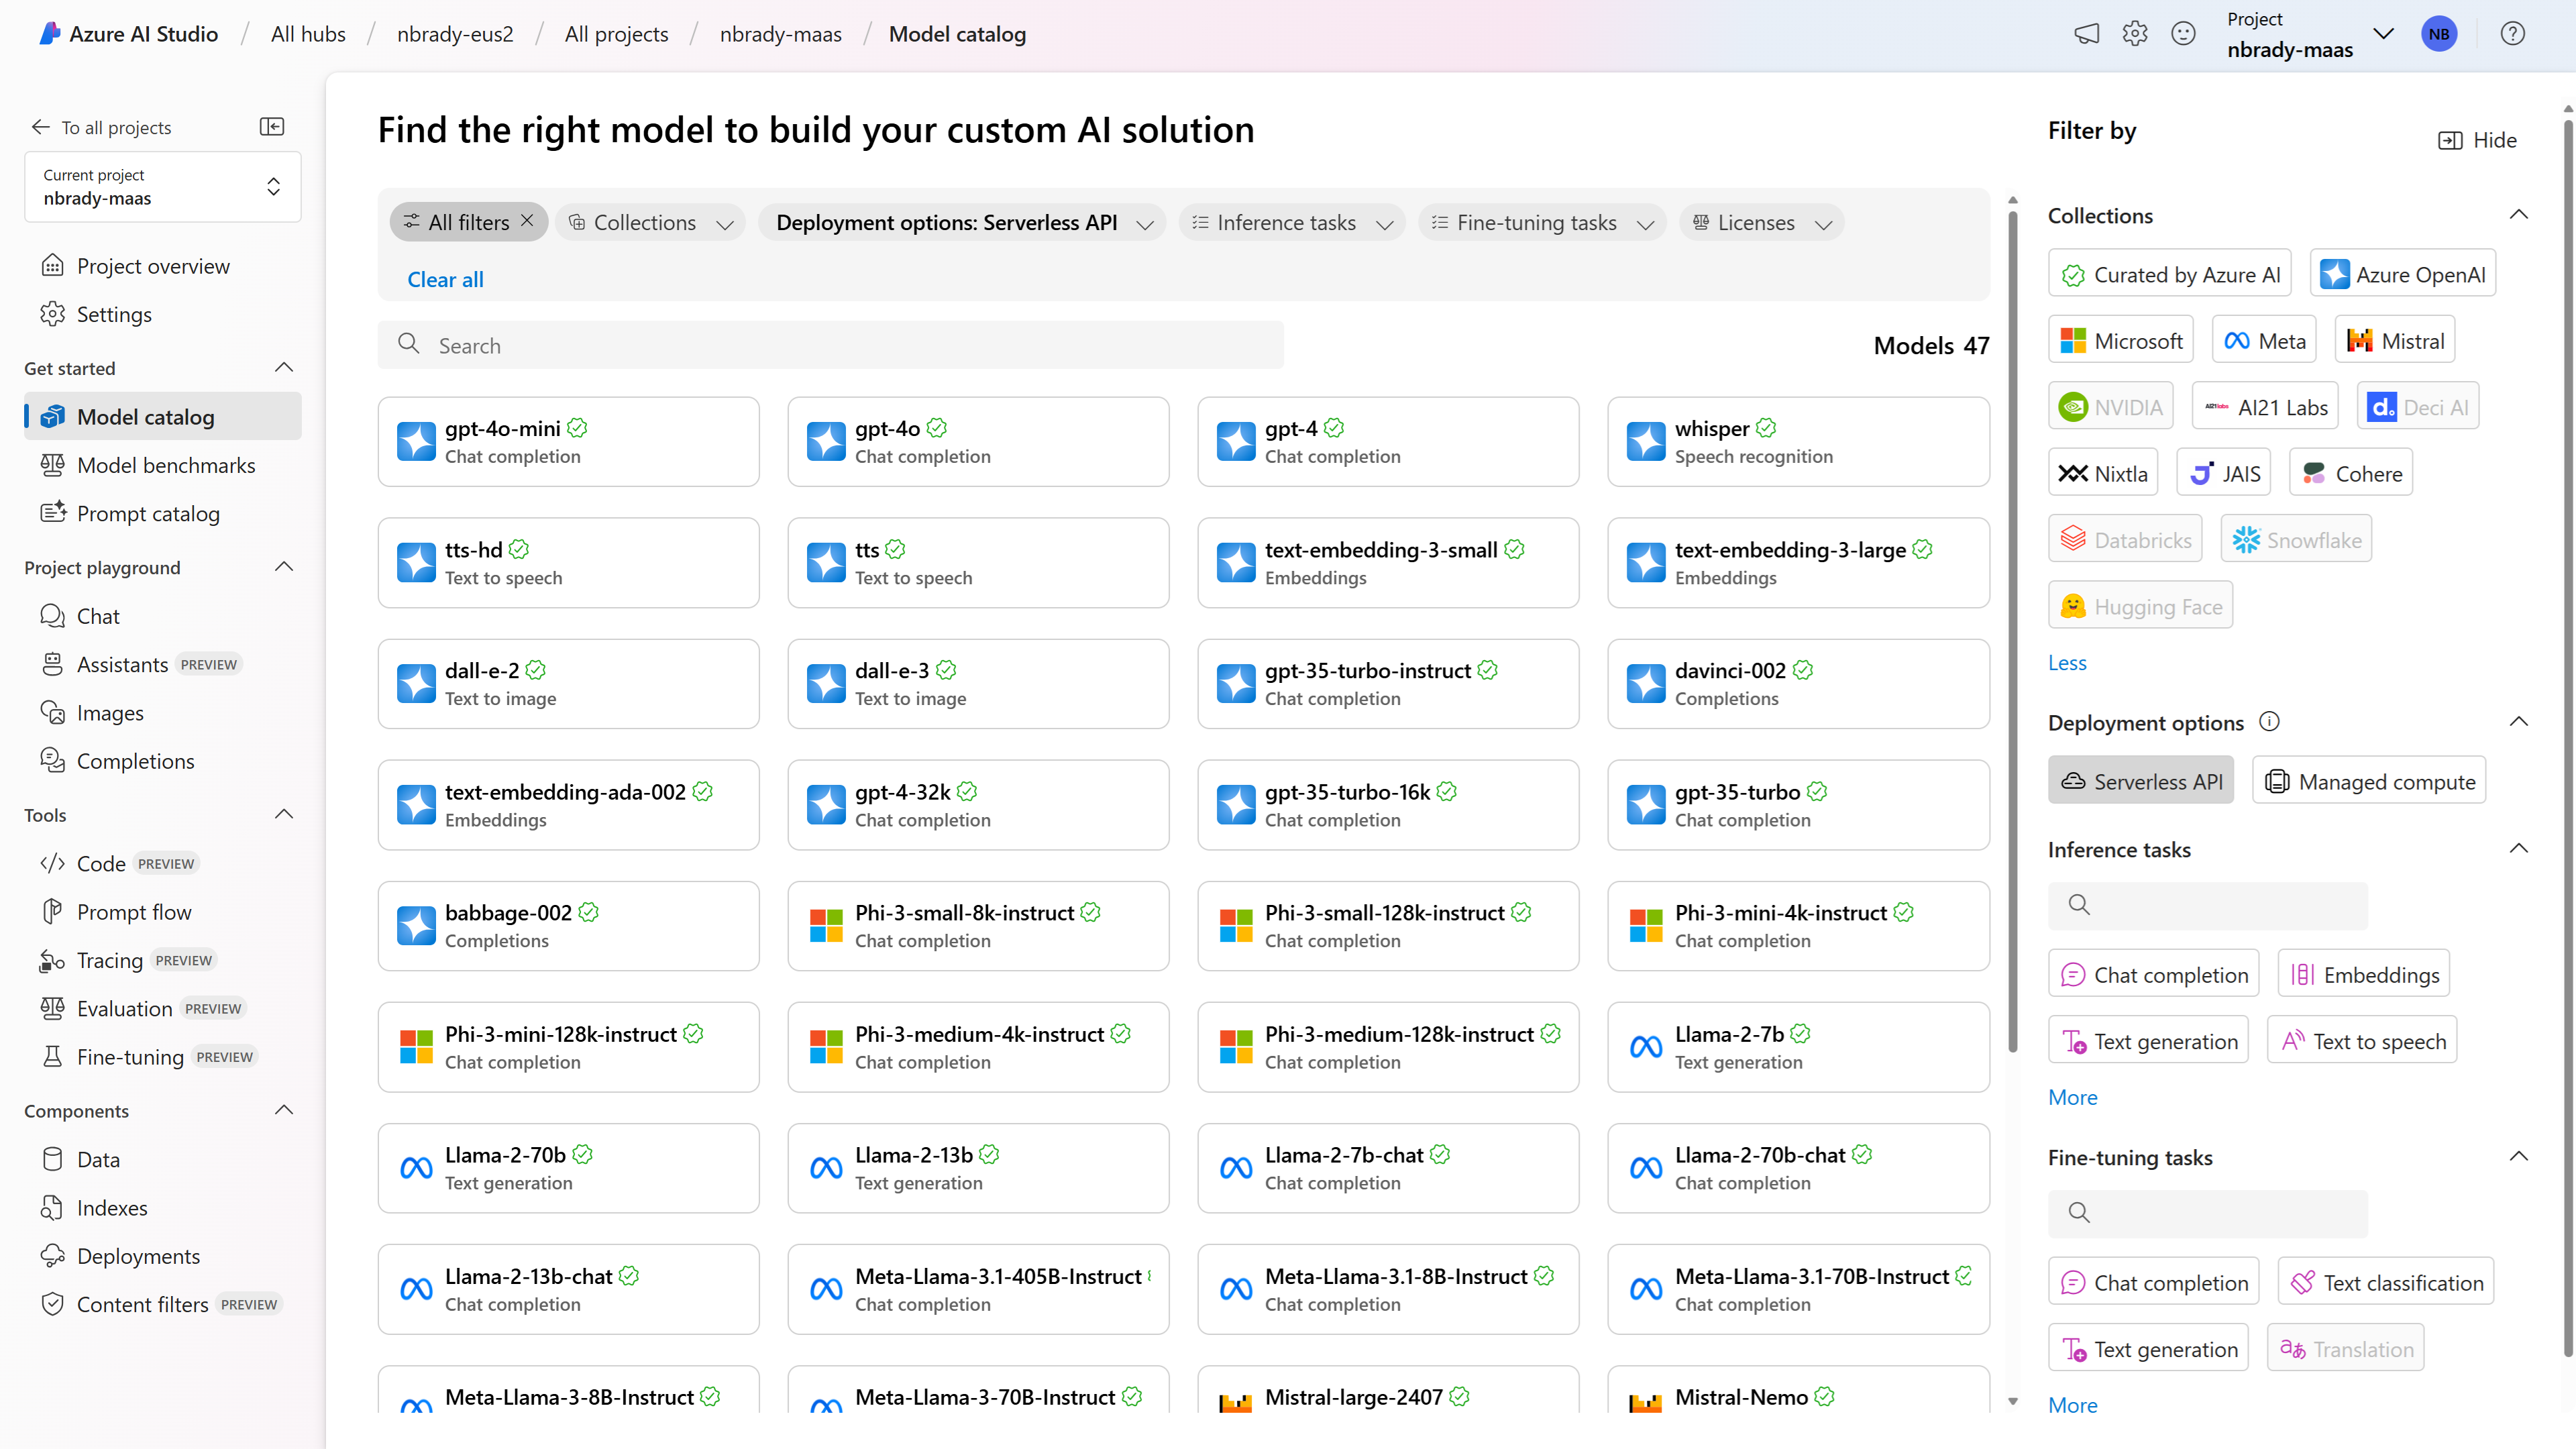
What is the model catalog?
The model catalog in AI Studio is a hub for discovering foundation models. It includes a diverse range of large language and vision foundation models curated by Microsoft, OpenAI, Hugging Face, Meta, Mistral AI, Cohere, Deci, Stability AI, Nixtla, and NVIDIA. These models are packaged for out-of-the-box usage and optimized for Azure AI Studio.
What is Models-as-a-Service (MaaS)?
MaaS is a new offering from Microsoft that allows developers to access and use a variety of open-source models hosted on Azure without the need to provision GPUs or manage back-end operations. MaaS offers inference APIs and hosted fine-tuning for models such as Meta Llama2, Meta Llama 3, Mistral Large, and others.
How many models are available today through MaaS?
Currently, Azure AI provides access to over 1,700 models, including offerings from Meta’s Llama 2 and Llama 3, Mistral AI’s Mistral Large, Cohere models, Core42 JAIS, Nixtla, and many more.
Deploy models as Serverless APIs
Azure AI not only offers an extensive catalog of models but also provides a streamlined way to deploy these models as serverless APIs. This deployment option is particularly advantageous for organizations looking to consume models without managing the underlying infrastructure, while maintaining enterprise-grade security and compliance.
Prerequisites
Before you get started, ensure that you have the following:
- An Azure subscription with a valid payment method.
- Access to Azure AI Studio.
- Appropriate Azure role-based access controls (Azure RBAC) on the resource group.
Steps to Deploy a Model as a Serverless API
- Find Your Model:
- Sign in to Azure AI Studio and navigate to the Model Catalog.
- Select the model you wish to deploy. For non-Microsoft models, ensure your project is subscribed to the model offering via Azure Marketplace.
- Deploy the Model:
- On the model’s detail page, select Deploy.
- Choose Serverless API to open the deployment wizard.
- Name your deployment (this will form part of the API URL) and select Deploy.
- Retrieve the Endpoint Information:
- Once the deployment is complete, navigate to the Deployments section in your project. Note the endpoint’s Target URI and Key. These will be used to call the deployment and generate predictions.

Using the Serverless API Endpoint
Your serverless API endpoint is now live and ready to be integrated into your applications. The Azure AI Model Inference API provides a consistent interface for consuming predictions from a wide range of models, ensuring that you can build intelligent applications with ease and efficiency.
For detailed information on how to consume predictions and further customize your deployment, refer to the Azure AI documentation.
Introducing the Azure AI Model Inference API
Once you’ve deployed your model as a serverless API, the next step is to interact with it efficiently. The Azure AI Model Inference API provides a powerful and consistent way to consume predictions from a wide variety of foundational models deployed in Azure AI Studio.
Benefits
The Azure AI Model Inference API standardizes how developers interact with different models, regardless of their unique capabilities. This uniformity allows you to:
- Improve performance in specific downstream tasks by using the right model for the job.
- Use more efficient or smaller models for simpler tasks.
- Compose multiple models to develop sophisticated AI experiences.
- Maintain portability and consistency without changing the underlying code.
Availability and Capabilities
The Azure AI Model Inference API is available for models deployed to serverless API endpoints and managed inference. Some of the key capabilities include:
- Text and Image Embeddings: Generate embedding vectors representing input text or images.
- Text and Chat Completions: Create model responses for text prompts or chat conversations.
- Extensibility: Pass extra parameters directly to the model to leverage additional capabilities beyond the standard API specifications.
Getting Started with the Azure AI Model Inference API
Using the Azure AI Model Inference API is straightforward. After deploying your model, you can install the necessary package and create a client to start making predictions:
pip install azure-ai-inference
Once your deployment is complete, you can retrieve the necessary endpoint URL and key directly from Azure AI Studio. Here’s a screenshot to help you locate this information:
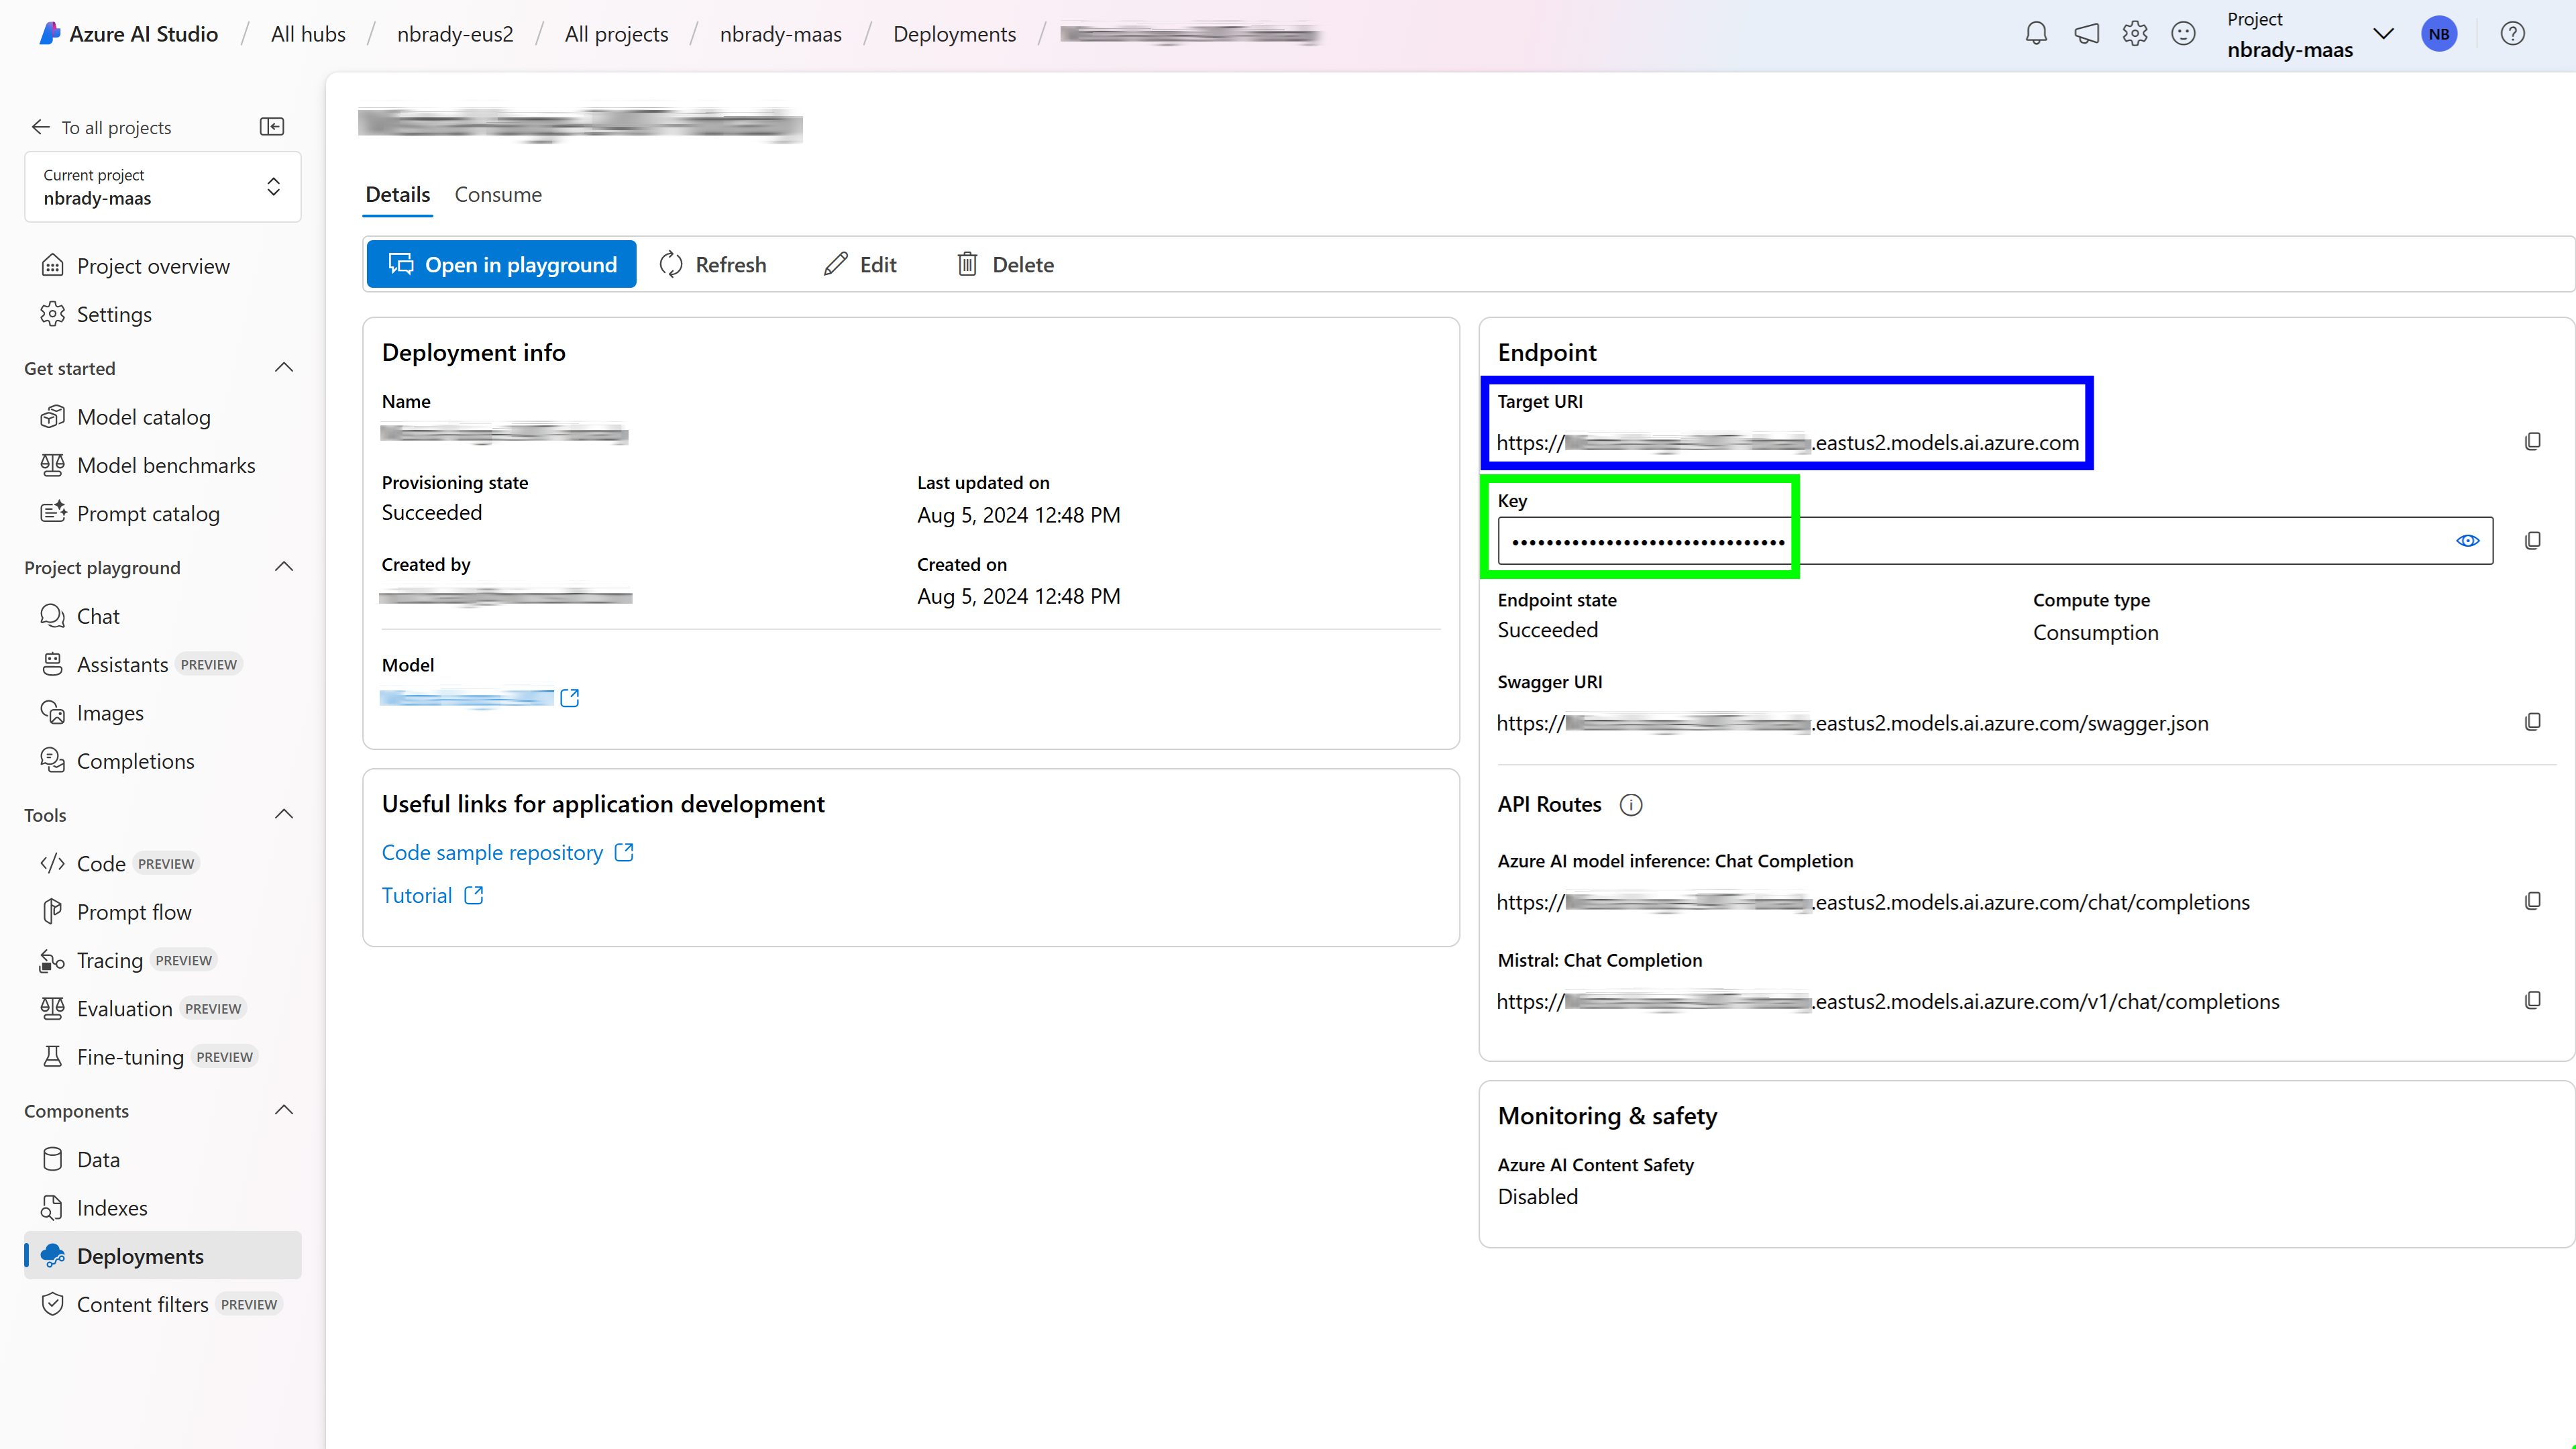
Target URI (Endpoint URL): Found under the “Endpoint” section (blue rectangle). Key: Found next to the “Key” label (green rectangle). Here’s an example of how to create a client and request chat completions using this information:
import os
from azure.ai.inference import ChatCompletionsClient
from azure.ai.inference.models import SystemMessage, UserMessage
from azure.core.credentials import AzureKeyCredential

model = ChatCompletionsClient(
    endpoint=os.environ["AZUREAI_ENDPOINT_URL"],
    credential=AzureKeyCredential(os.environ["AZUREAI_ENDPOINT_KEY"]),
)

response = model.complete(
    messages=[
        SystemMessage(content="You are a helpful assistant."),
        UserMessage(content="How many languages are in the world?"),
    ]
)

print(response.choices[0].message.content)
For more details and advanced features, including extensibility options, visit the Azure AI Model Inference API documentation.
With these capabilities, the Azure AI Model Inference API provides a consistent and powerful interface that supports your AI development needs.
Step-by-Step Walkthrough to Build the Azure AI Models-as-a-Service (MaaS) Chatbot Arena
In this section, we’ll dive into the code components of the Azure AI Models-as-a-Service (MaaS) Chatbot Arena example, guiding you through the process of setting up an interactive interface for comparing various large language models.
1. Imports and Initialization
To get started, we need to ensure that all necessary libraries and packages are installed for the project. We’ll be working with Azure AI’s Inference SDK, Gradio for building the interactive interface, and some additional tools for data handling.
First, install the dependencies listed in the requirements.txt file:
pip install -r requirements.txt
Next, import the required libraries:
from azure.ai.inference import ChatCompletionsClient
from azure.ai.inference.models import SystemMessage, UserMessage
from azure.core.credentials import AzureKeyCredential
import gradio as gr
import os
from datasets import load_dataset
import pandas as pd
from maas_clients import initialize_clients
This setup ensures that we have all the tools we need to work with different language models, load data, and build the user interface.
We will come back to
maas_clientsPython file we created in a future step.
2. Data Loading and Pre-processing
The Massive Multitask Language Understanding (MMLU) dataset is a comprehensive benchmark for evaluating language models across a range of subjects. We’ll use this dataset to generate example questions that will be used to test the models.
# Load the MMLU dataset from the "cais/mmlu" repository
ds = load_dataset("cais/mmlu", "all")

# Convert the 'test', 'validation', and 'dev' splits of the dataset into DataFrames
test_df = pd.DataFrame(ds['test'])
validation_df = pd.DataFrame(ds['validation'])
dev_df = pd.DataFrame(ds['dev'])

# Optionally, concatenate all DataFrames into one combined DataFrame
combined_df = pd.concat([test_df, validation_df, dev_df], ignore_index=True)

# Extract a distinct list of all subjects in the 'subject' column and store it in a variable
subjects_array = combined_df['subject'].unique()
subjects = subjects_array.tolist()
By loading and processing this dataset, we prepare a wide range of examples that can be used to compare the outputs of different models side by side.
3. Client Initialization
To interact with different language models, we initialize clients using a helper function from the maas_clients.py file. This function sets up connections to multiple models, allowing us to switch between them easily.
clients = initialize_clients()

# Access clients like this
gpt_4o_client = clients["gpt_4o_client"]
gpt_4_turbo_client = clients["gpt_4_turbo_client"]
# ...additional clients
Note: The
initialize_clientsfunction is defined in themaas_clients.pyfile, located in the examples/maas-arena directory. This file contains all the endpoint information for each model you’ve deployed, and loads these configurations from environment variables.
Here’s what the maas_clients.py file looks like:
from azure.ai.inference import ChatCompletionsClient
from azure.core.credentials import AzureKeyCredential
from dotenv import load_dotenv
import os

# Load environment variables from .env file
load_dotenv()

def initialize_clients():
    clients = {
        "gpt_4o_client": ChatCompletionsClient(
            endpoint=os.getenv("GPT_4O_ENDPOINT"),
            credential=AzureKeyCredential(os.getenv("GPT_4O_KEY")),
            headers={"api-key": os.getenv("GPT_4O_API_KEY")},
            api_version="2024-06-01"
        ),
        "gpt_4_turbo_client": ChatCompletionsClient(
            endpoint=os.getenv("GPT_4_TURBO_ENDPOINT"),
            credential=AzureKeyCredential(os.getenv("GPT_4_TURBO_KEY")),
            headers={"api-key": os.getenv("GPT_4_TURBO_API_KEY")},
            api_version="2024-06-01"
        ),
        "jamba_instruct_client": ChatCompletionsClient(
            endpoint=os.getenv("JAMBA_INSTRUCT_ENDPOINT"),
            credential=AzureKeyCredential(os.getenv("JAMBA_INSTRUCT_KEY"))
        ),
        "command_r_client": ChatCompletionsClient(
            endpoint=os.getenv("COMMAND_R_ENDPOINT"),
            credential=AzureKeyCredential(os.getenv("COMMAND_R_KEY"))
        # --------------------------------------------
        # TRUNCATED - See the file for more endpoints.
        # --------------------------------------------
        ),
    }
    return clients
This script ensures that each model client is initialized with the correct endpoint and authentication details, allowing you to seamlessly interact with multiple models in your chatbot arena.
4. Adding some styling
Using Gradio, we’ll build an interactive interface where users can input questions, select models, and view responses in real-time. We also define some CSS for styling and an HTML title for the interface.
css = """
h1 {
  margin: 0;
  flex-grow: 1;
  font-size: 24px;
  min-width: 200px;
}
"""

title = """<h1 style="text-align: center;">Welcome to the Azure AI Models-as-a-Service (MaaS) Arena</h1>"""
5. Inference and Model Selection Functions
We define functions that handle inference and model selection. These functions allow users to input a message, select a model, and receive a response from the chosen model.
def user_model(user_message, chat_history):
    return "", chat_history + [[user_message, None]]

def chat_model_1(chat_history, temp, max_tokens, model_name):
    selected_client = select_model(model_name)
    chat_history[-1][1] = ""

    messages = [{"role": "system", "content": "You are a helpful assistant."}]
    for user, assistant in chat_history[:-1]:
        messages.append({"role": "user", "content": user})
        if assistant is not None:
            messages.append({"role": "assistant", "content": assistant})
    messages.append({"role": "user", "content": chat_history[-1][0]})

    response = selected_client.complete(
        stream=True,
        messages=messages,
        temperature=temp,
        max_tokens=max_tokens
    )

    for update in response:
        if update.choices and update.choices[0].delta.content is not None:
            chat_history[-1][1] += update.choices[0].delta.content or ""
            yield chat_history

    yield chat_history

def select_model(model_name):
    # Map the model name to the corresponding client
    if model_name == "GPT-4o":
        return gpt_4o_client
    elif model_name == "GPT-4 Turbo":
        return gpt_4_turbo_client
    # ...additional model mappings
    else:
        raise ValueError(f"Unknown model name: {model_name}")
These functions enable dynamic model selection and response generation, making it easy to experiment with different models and configurations.
6. Building the Gradio Interface
We bring everything together by building the Gradio interface. This interface includes dropdowns for model selection, chat interfaces for displaying responses, and controls for adjusting parameters like temperature and max tokens.
with gr.Blocks(css=css) as demo:
    gr.HTML(title)

    with gr.Row():
        model_dropdown1 = gr.Dropdown(
            choices=[
                "GPT-4o", "GPT-4 Turbo", "AI21 Jamba-Instruct", "Cohere Command R",
                # ...additional models
            ],
            label="Model A",
            value="Llama3.1 405B"
        )
        model_dropdown2 = gr.Dropdown(
            choices=[
                "GPT-4o", "GPT-4 Turbo", "AI21 Jamba-Instruct", "Cohere Command R",
                # ...additional models
            ],
            label="Model B",
            value="Mistral-Large"
        )

    with gr.Row():
        chatbot1 = gr.Chatbot(placeholder="No messages yet", label="Llama3.1 405B")
        chatbot2 = gr.Chatbot(placeholder="No messages yet", label="Mistral-Large")

    with gr.Row():
        user_msg = gr.Textbox(placeholder="Ask me anything", label="User Messages", scale=7)
        submit_button = gr.Button("Send", variant="primary")
        clear_button = gr.Button("Clear")

    additional_inputs_accordion = gr.Accordion(label="⚙️ Parameters", open=True)
    with additional_inputs_accordion:
        temperature = gr.Slider(minimum=0, maximum=1, step=0.1, value=0.90, label="Temperature")
        max_tokens = gr.Slider(minimum=128, maximum=4096, step=128, value=2048, label="Max tokens")

        with gr.Row():
            subject = gr.Dropdown(choices=subjects, label="Subject")
            generate = gr.Button(value="Generate", variant="secondary")
            random_button = gr.Button(value="Random", variant='secondary')
            clear = gr.Button(value="Clear", variant="secondary")

        examples = gr.Examples(examples=cached_examples, inputs=user_msg, label="Examples")

        generate.click(fn=update_examples, inputs=[subject], outputs=examples.dataset)
        random_button.click(fn=update_random_examples, inputs=[subject], outputs=examples.dataset)
        clear.click(fn=revert_to_cached_examples, inputs=None, outputs=examples.dataset)
        examples.dataset.click(fn=display_example, inputs=examples.dataset, outputs=user_msg)

    model_dropdown1.select(fn=update_chatbot, inputs=[model_dropdown1], outputs=[chatbot1])
    model_dropdown2.select(fn=update_chatbot, inputs=[model_dropdown2], outputs=[chatbot2])

    user_msg.submit(user_model, [user_msg, chatbot1], [user_msg, chatbot1], queue=False).then(
        chat_model_1, [chatbot1, temperature, max_tokens, model_dropdown1], [chatbot1]
    )

    user_msg.submit(user_model, [user_msg, chatbot2], [user_msg, chatbot2], queue=False).then(
        chat_model_2, [chatbot2, temperature, max_tokens, model_dropdown2], [chatbot2]
    )

    submit_button.click(user_model, [user_msg, chatbot1], [user_msg, chatbot1], queue=False).then(
        chat_model_1, [chatbot1, temperature, max_tokens, model_dropdown1], [chatbot1]
    )

    submit_button.click(user_model, [user_msg, chatbot2], [user_msg, chatbot2], queue=False).then(
        chat_model_2, [chatbot2, temperature, max_tokens, model_dropdown2], [chatbot2]
    )

    clear_button.click(lambda: None, None, chatbot1, queue=False)
    clear_button.click(lambda: None, None, chatbot2, queue=False)

if __name__ == "__main__":
    demo.launch(debug=True)
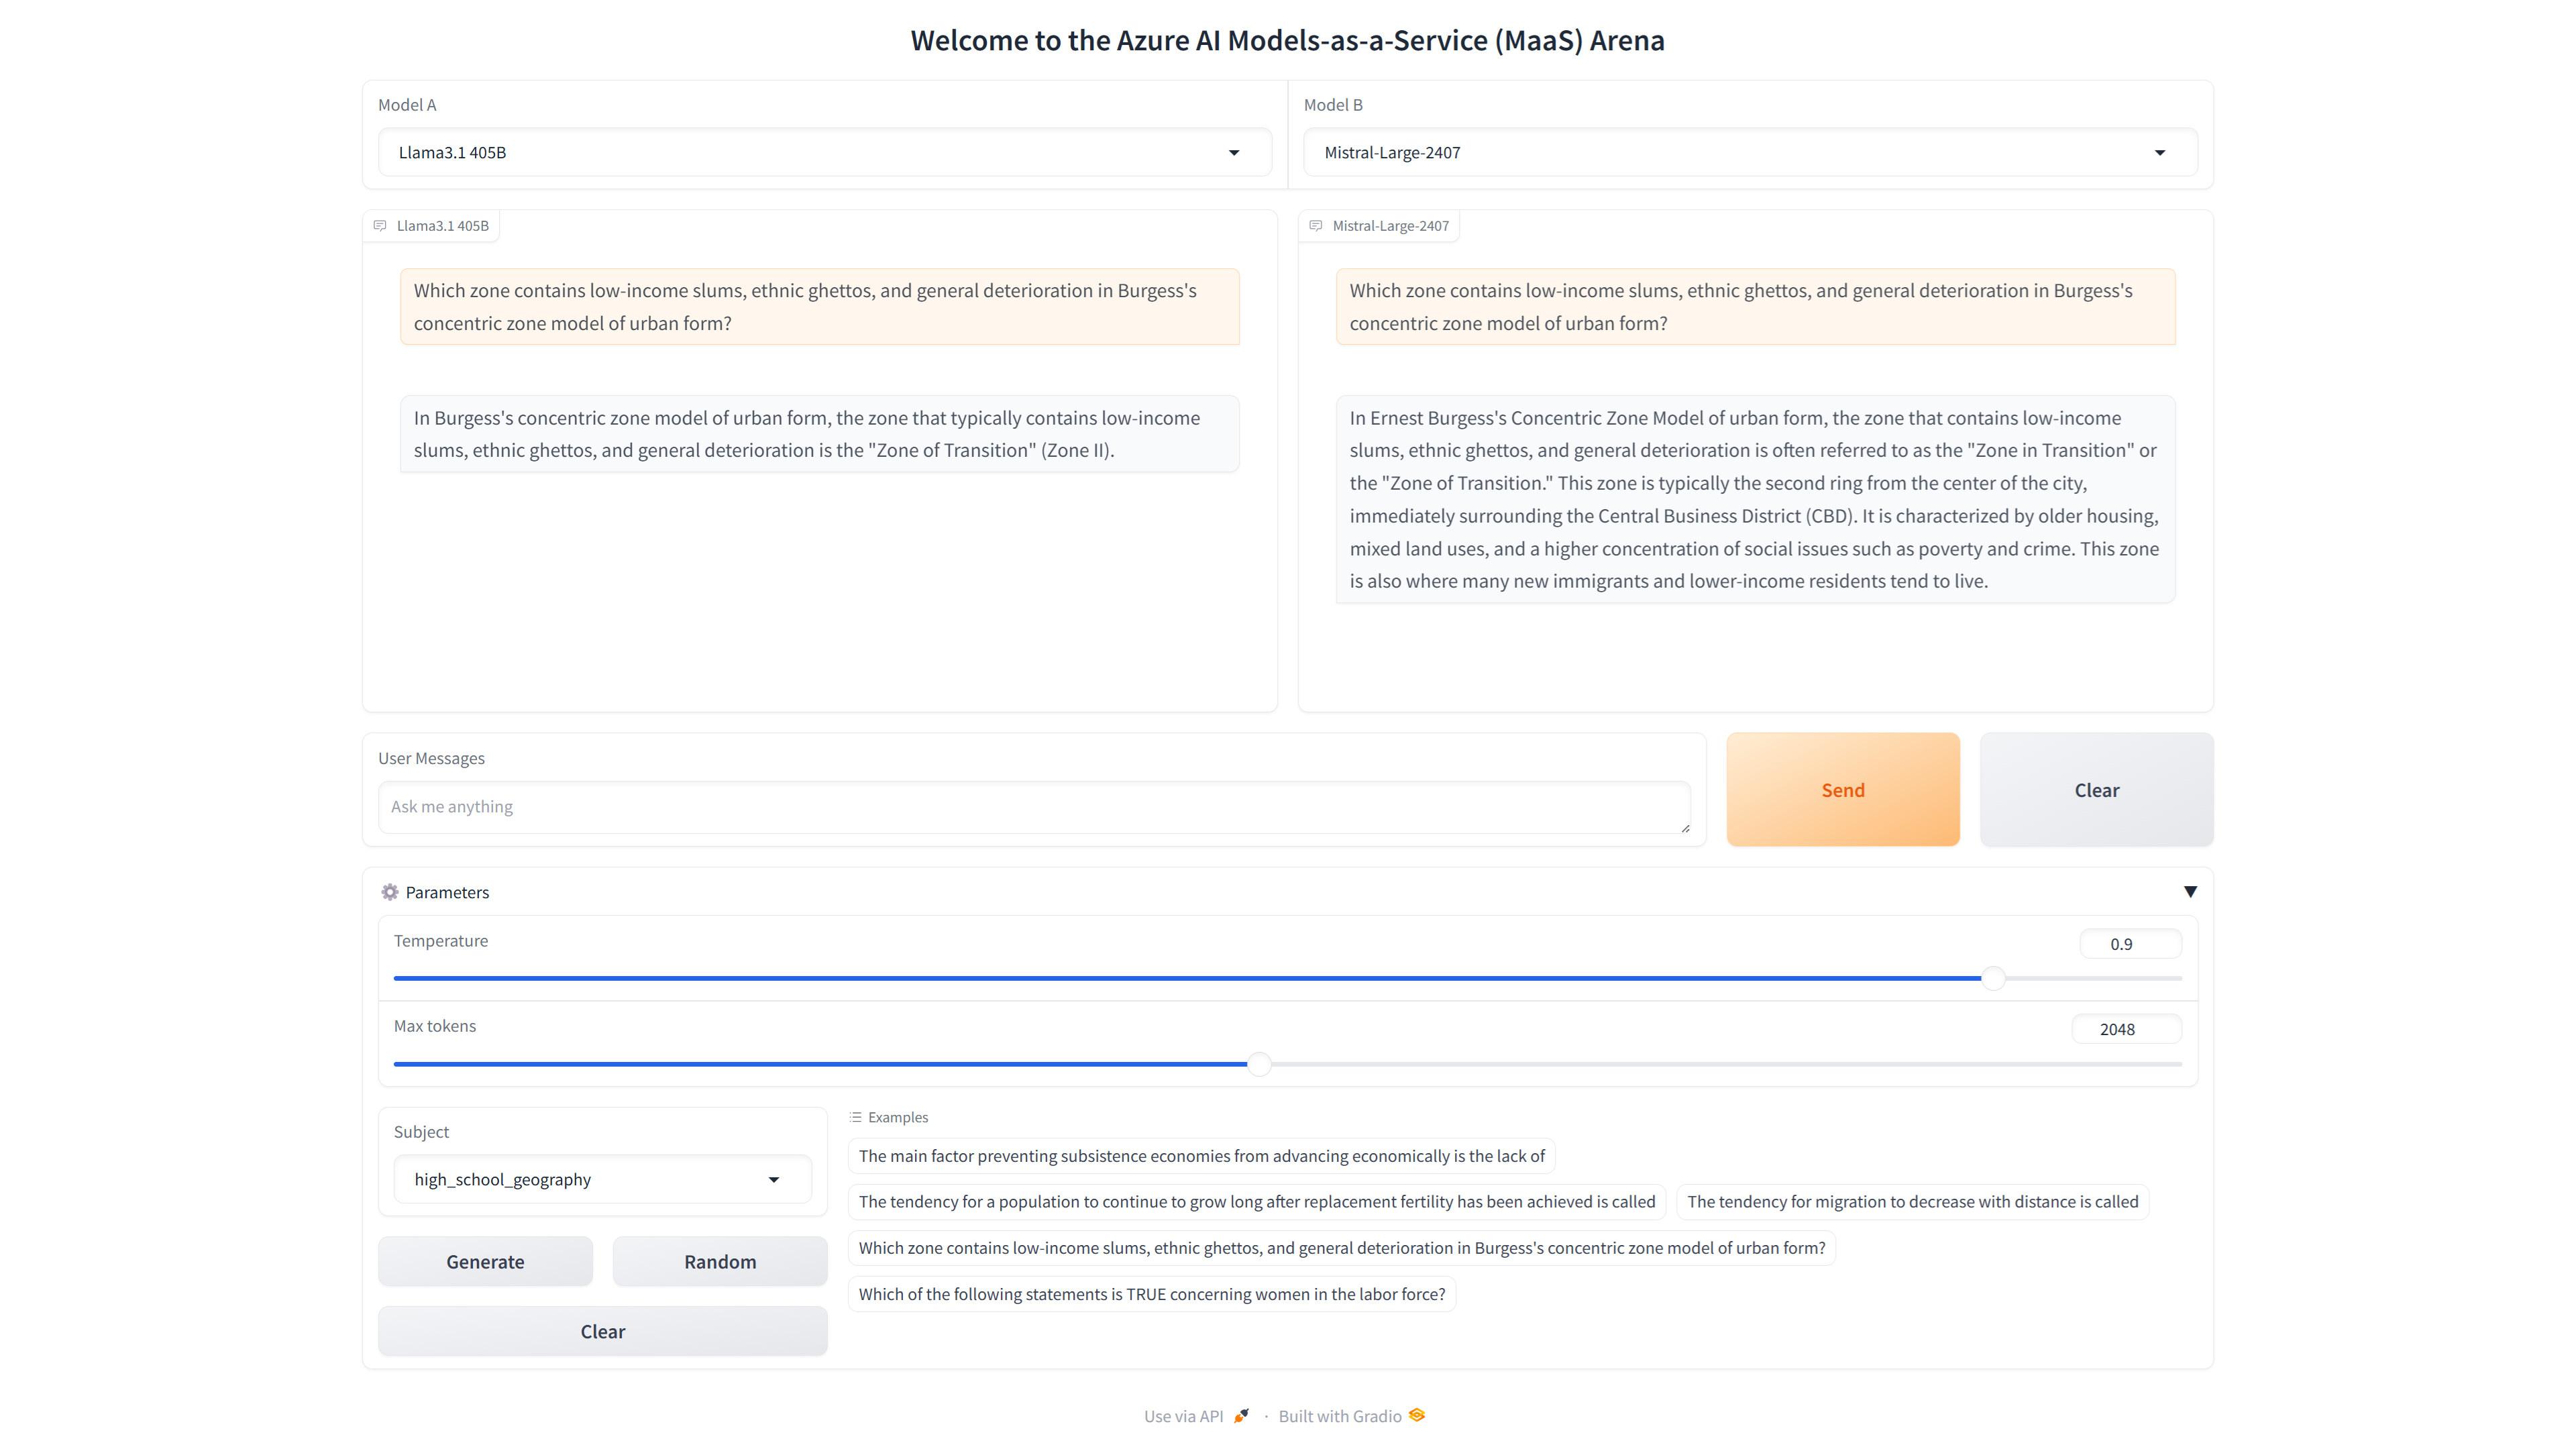
7. Running the Arena
Now that we have everything set up, it’s time to launch the Gradio interface and interact with our Azure AI Models-as-a-Service (MaaS) Chatbot Arena. This interface will allow you to compare different large language models (LLMs) side by side in real-time, offering insights into their performance, response quality, and suitability for your specific needs.
To launch the interface, simply run all the cells in the notebook.

This will start the Gradio app and open the interactive interface in your default web browser. From here, you can:
- Select Models: Choose different models to compare from the dropdown menus.
- Ask Questions: Input any question or prompt you’d like to test across the selected models.
- View Responses: The chat interfaces will display the responses generated by each model, allowing you to evaluate their performance side by side.
- Adjust Parameters: Modify parameters like temperature and max tokens to fine-tune how the models generate their responses.
- Generate Examples: Use the subject dropdown and buttons to generate example questions, either based on specific subjects or randomly. By following these steps, you can explore the capabilities of various models, gain a deeper understanding of their strengths and weaknesses, and make informed decisions about which model best fits your needs.
Conclusion
In this tutorial, we tackled the challenge of comparing large language models by creating an interactive arena using Azure AI’s Models-as-a-Service. We’ve explored how to deploy models, set up a Gradio-based interface, and utilize the Azure AI Model Inference API to streamline the model comparison process.
But don’t stop here—continue exploring, learning, and building.
Want to see more content like this? Connect with me on LinkedIn. If you found this tutorial helpful, consider sharing it with colleagues or your professional network. The more we share, the more we can collectively advance the field of AI. I can’t wait to see what you create with Azure AI. Happy innovating!